* Note: this document describes how to install Team Password Manager if your server has all the required components. Check the requirements document to learn more about them.
Here you have other alternative methods of installing Team Password Manager:
Short Version
Important installation notes
1. Install the SourceGuardian Loader or the ionCube Loader. Both loaders are free.
2. Create the database in MySQL.
3. Upload the file to the server, decompress and place on web root.
4. Fill in the database parameters in config.php.
5. Execute the installer.
6. Register licenses (optional): click on the “Settings” option and the “Add a license”.
7. Place files outside of webroot (optional). See folder.php.
8. Make the 'import' folder writable by the web server.
9. Make the 'uploads' folder writable by the web server.
Long Version
We assume you already have a working installation of Apache (or NGINX or IIS), PHP and MySQL. Check these notes before starting:
Important installation notes
- We advise you to delete the following files from your Team Password Manager folder: install.txt, eula.txt and upgrade.txt.
- If you're using Apache 2 with FPM/FastCGI:
- Set this parameter in config.php:
define('TPM_URI_PROTOCOL', 'PATH_INFO');. More information on TPM_URI_PROTOCOL. - Set
cgi.fix_pathinfo=1in php.ini (Restart Apache after doing changes in php.ini). - If you want to use the API, put this directive in the virtualhosts file or .htaccess (in the root of TPM):
SetEnvIf Authorization .+ HTTP_AUTHORIZATION=$0
- Set this parameter in config.php:
- If you're using Apache 2 with CGI/FastCGI:
- Set
cgi.fix_pathinfo=1in php.ini (Restart Apache after doing changes in php.ini). - If you want to use the API, put this directive in the virtualhosts file or .htaccess (in the root of TPM):
SetEnvIf Authorization .+ HTTP_AUTHORIZATION=$0
- Set
- If you're using IIS:
- Set
cgi.fix_pathinfo=1in php.ini. - Allow double escaping.
- Set
- If you're using NGINX, use this in your configuration file:
location / {
	try_files $uri $uri/ /index.php;
}
Then follow these steps to install Team Password Manager:
1. Install the SourceGuardian Loader or the ionCube Loader
You need to install the SourceGuardian Loader if your version of Team Password Manager is 11 or higher. This is the option if you're installing the latest version of Team Password Manager.
You need to install the ionCube Loader if your version of Team Password Manager is 10 or lower.
Both loaders are free.
Installing the SourceGuardian Loader
Check with phpinfo if you already have the loader installed. If the SourceGuardian loader is installed you should be able to see the SourceGuardian section in phpinfo, like this one:
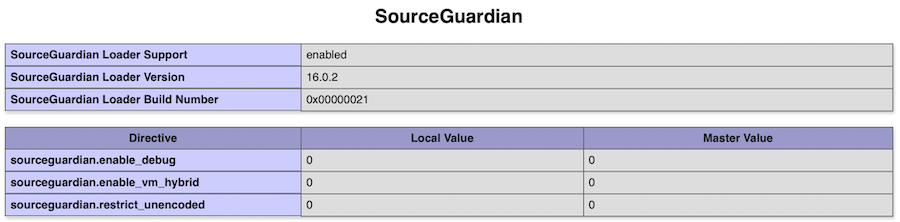
Note that the latest version of Team Password Manager requires at least Sourceguardian Loader v. 16.0.0.
If the SourceGuardian Loader is not installed (or if it's an old version), install it: go to the SourceGuardian Loader Assistant page and follow the instructions.
After installing the loader, restart your webserver or FPM.
Installing the ionCube Loader
Check with phpinfo if you already have the loader installed. If the ionCube loader is installed you should be able to see it mentioned in the Zend Engine section in phpinfo, like here:

If the ionCube Loader is not installed, install it:
- Download the ionCube Loader Wizard (http://www.ioncube.com/loader-wizard/loader-wizard.zip or http://www.ioncube.com/loader-wizard/loader-wizard.tgz).
- Decompress and copy the wizard script (loader-wizard.php) into your web server.
- Open the script on your browser and follow instructions.
After installing the loader, restart your webserver or FPM.
Important: at the end of this step (or at the end of the install process), make sure you delete the phpinfo file. It is not needed for Team Password Manager to run and it's giving away information about your server.
2. Create the database in MySQL
A note for MySQL 8
The following is only required if you're using an old version of Team Password Manager with a version of PHP less than 7.4. Newer versions of Team Password Manager that use PHP 7.4+ can ignore this note.
If you installed MySQL 8 with the authentication method "Use Strong Password Encryption for Authentication" you should set the default_authentication_plugin to mysql_native_password. You can do this in the MySQL configuration file (my.cnf/my.ini) or using the Workbench:
- Using the MySQL configuration file (my.cnf/my.ini): put this in the
[mysqld]section (or replace the current setting):default_authentication_plugin = mysql_native_password - Using the Workbench:
- Select "Options file" in the left sidebar, under "INSTANCE".
- Select the "Security" tab of the Options file.
- Scroll down to default_authentication_plugin and set it to mysql_native_password
- Apply
Restart the MySQL server after doing these changes.
You have to create the database that will store Team Password Manager data. Make sure the database user has enough privileges to create tables and insert/delete data.
You can use the following commands in the MySQL prompt or in phpMyAdmin:
CREATE DATABASE `tpm_database` CHARACTER SET utf8 COLLATE utf8_unicode_ci;
CREATE USER 'tpm_user'@'localhost' IDENTIFIED BY 'tpm_password';
GRANT ALL PRIVILEGES ON  `tpm_database`.* TO 'tpm_user'@'localhost';
FLUSH PRIVILEGES;
These commands create a database called tpm_database and a user called tpm_user with password tpm_password with all privileges on tpm_database.
3. Upload the file to the server
Decompress the Team Password Manager file (teampasswordmanager_x.x.x.zip) and upload the resulting files and folders to the server web root.
4. Fill in the configuration file
The configuration file config.php contains the database parameters that Team Password Manager uses:
- CONFIG_HOSTNAME: hostname of the machine where the database executes. Usually localhost.
- CONFIG_USERNAME: username to access the database server and the database created in step 2.
- CONFIG_PASSWORD: the password for the username. There needs to be a password, a blank one is not valid.
- CONFIG_DATABASE: the name of the database created in step 2.
5. Execute the installer
Point your browser to web_location_of_Team Password Manager_files/index.php/install and follow instructions. Example:
http://teampasswordmanager.mydomain.com/index.php/install
If everything is correct you have now a working Team Password Manager system.
If you get the Internal Server Error 500 when executing the installer, see the document called Troubleshooting Internal Server Error 500.
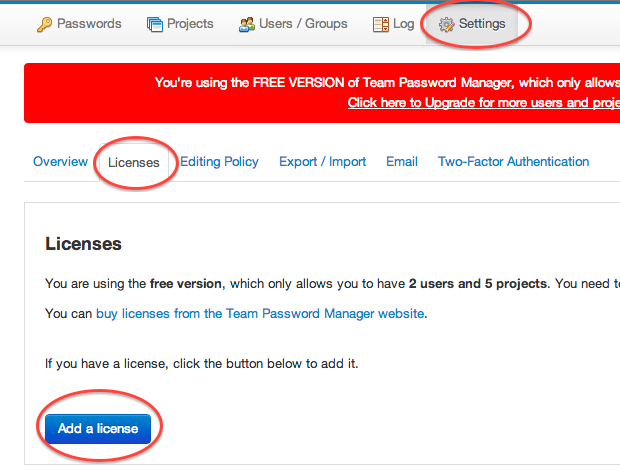
6. Register licenses
Log into Team Password Manager with the user created on step 5 by the installer and click on “Settings” on the top menu. Go to the “Licenses” tab, click “Add a license” and fill in the license data sent to you by e-mail.
7. Move the program files outside of webroot (optional)
For increased security you can place most of the files of Team Password Manager outside webroot, thus protecting them from direct Internet access.
The files that need to be “visible” are: index.php, folder.php, the css folder and the import folder. All the other files and folders can be located anywhere else on your system. This location is then entered in the APP_FOLDER parameter on the folder.php file. See folder.php for more instructions.
8. Make the 'import' folder writable by the web server
This folder is used by the import process. Give it 755 permissions so that Team Password Manager can write in it.
9. Make the 'uploads' folder writable by the web server
This folder is used to store files uploaded in passwords and projects. Give it 755 permissions so that Team Password Manager can write in it. You can also change its default location. Check config.php.
Document changelog
| Mar 12, 2025: |
Deleted link to TPM-Vagrant Added links to Ubuntu installations Updated note for MySQL 8 Sourceguardian Loader minimum version 16.0.0 |
| Aug 10, 2022: | Updated for v. 11+ |