How to install Team Password Manager on Windows using XAMPP
Current Team Password Manager version: 14.190.309If you want to install Team Password Manager on a Windows system you will also need to install the required server components to run it: web server, PHP and MySQL. You can either install these "manually" one by one, or you can use something like XAMPP.
XAMPP (https://www.apachefriends.org) provides a convenient and quick way to install Apache, PHP and MySQL (and more) on Windows systems so that you can quickly proceed to install Team Password Manager and have a system up and running in no time.
This document will guide you in the installation of XAMPP and Team Password Manager. It has the following sections:
- Installing XAMPP
- Installing the SourceGuardian Loader
- Installing Team Password Manager
- Installing LDAP support in XAMPP
- HTTPS and installing an SSL Certificate from a Commercial Certificate Authority
Note: this guide uses Windows Server 2016, but you can install Team Password Manager on almost all Windows systems, from XP to Windows 10/11. Please check the XAMPP requirements.
1. Installing XAMPP
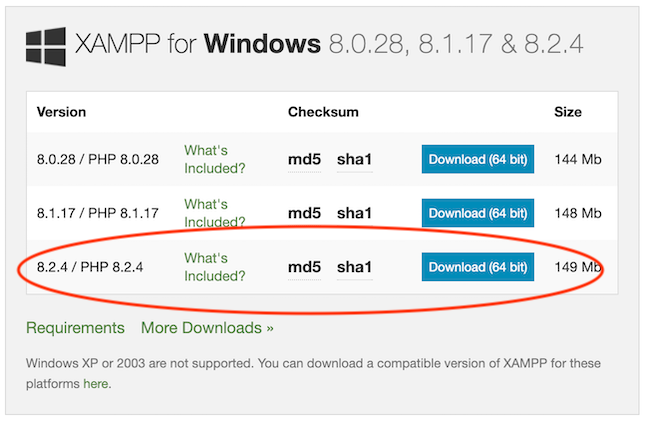
1.1 Download XAMPP from . Check the requirements section to choose which version of XAMPP to use depending on your Windows system.
Team Password Manager requires PHP 8.0 to 8.4.
For this tutorial we choose XAMPP v.8.2.4.
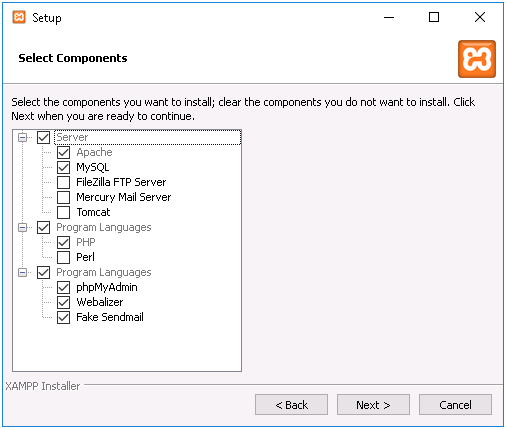
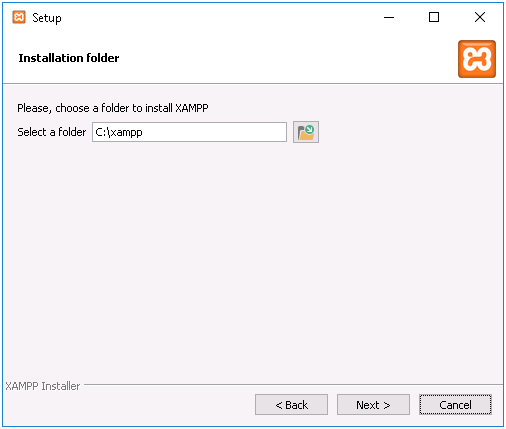
1.2 Execute the XAMPP installer. You can select all the components or just the ones required to run Team Password Manager (Apache, PHP and MySQL). Select also phpMyAdmin, we'll use it to create the database. Also, for this tutorial, we're going to be using the default folder which is c:\xampp, but you may choose another one (there's an UAC warning when you execute the installer that you can ignore if you use c:\xampp).
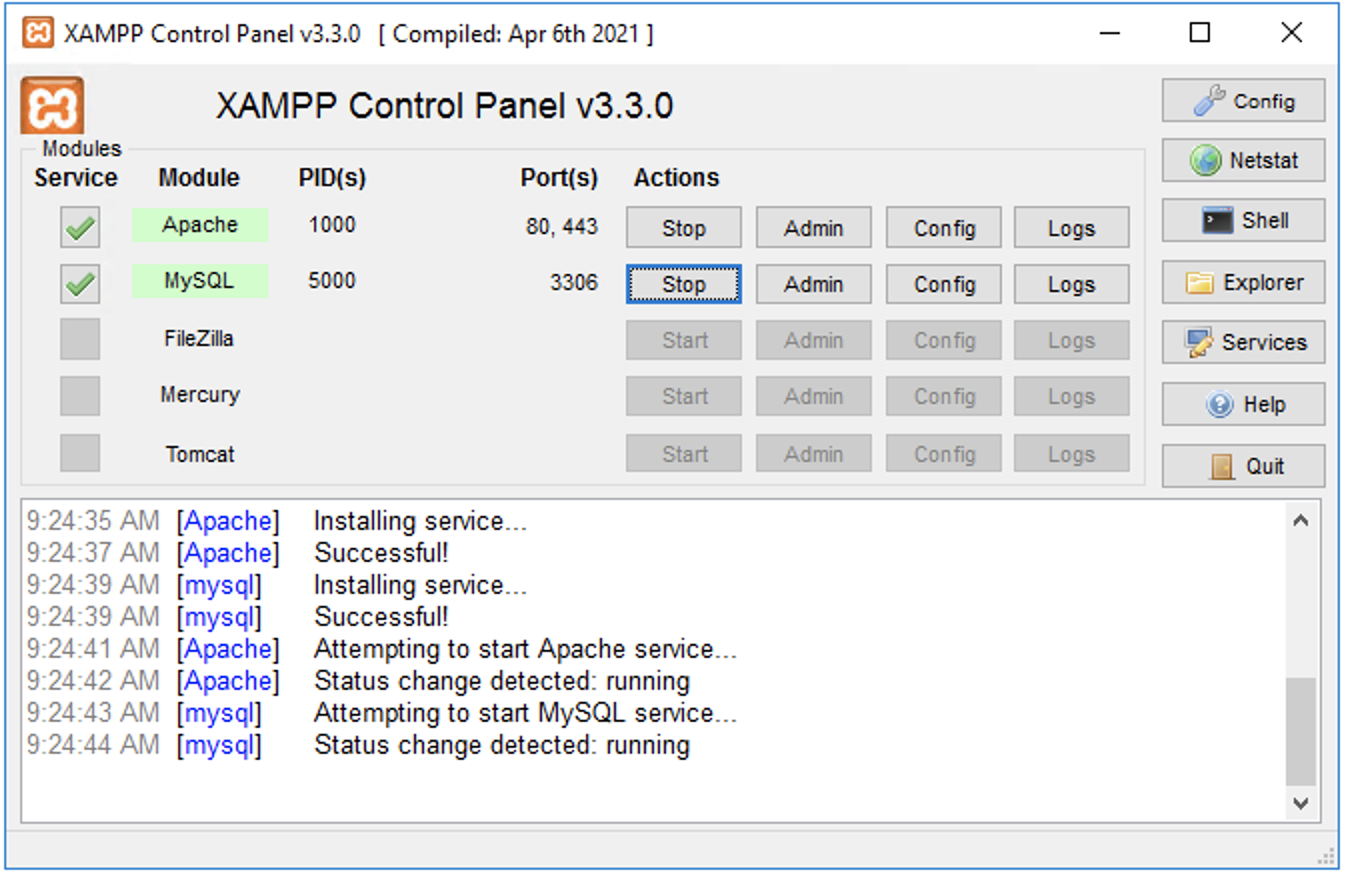
1.3 When the installer has finished, open the XAMPP Control Panel. The XAMPP Control Panel is located in c:\xampp\xampp-control.exe.
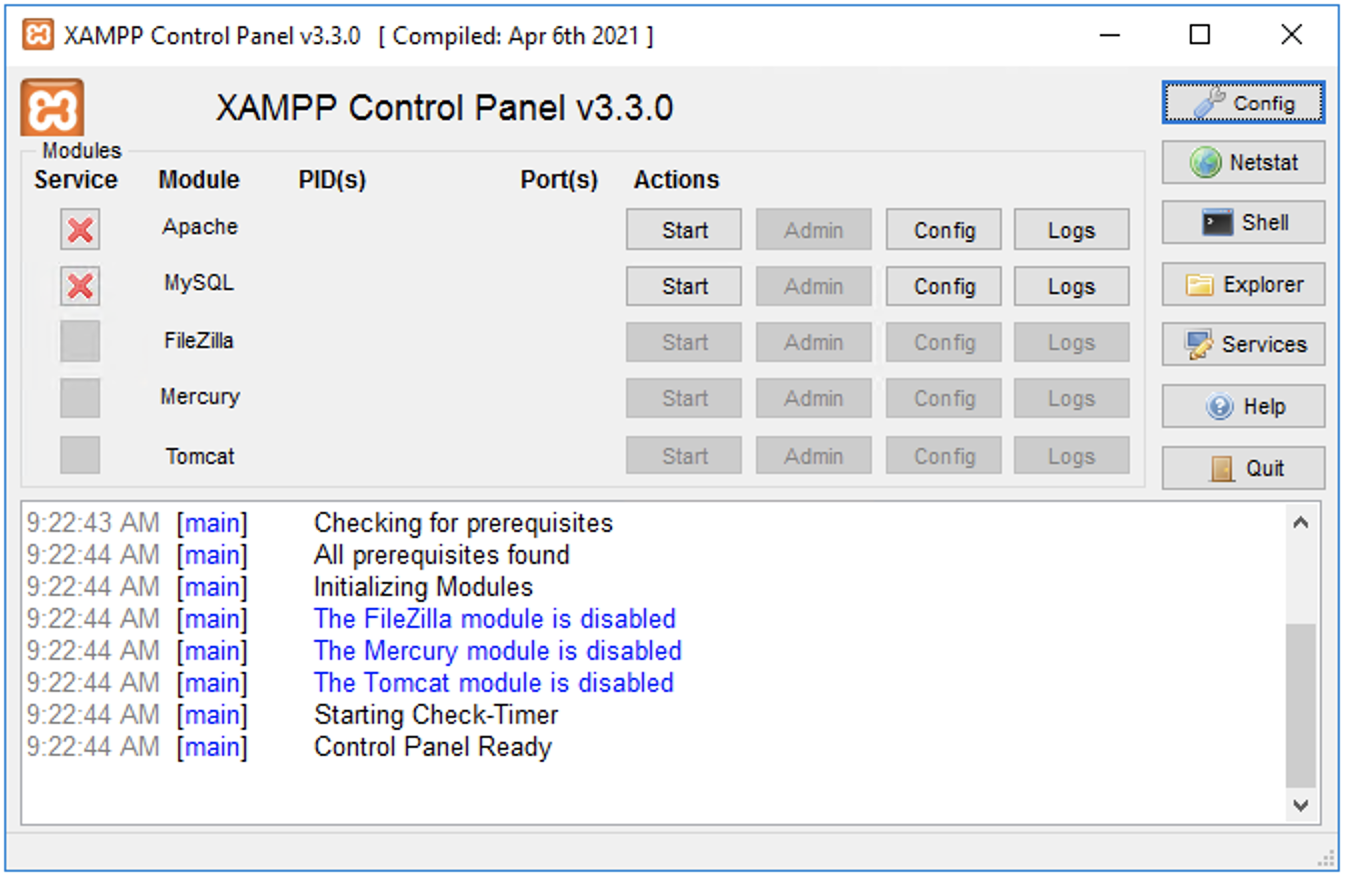
1.4 Click on the "Service" checkboxes for Apache and MySQL to enable Apache and MySQL as services.
Note: If you cannot check the "Service" checkboxes, run the XAMPP Control Panel as Administrator.
1.5 Start Apache and MySQL. The control panel should now look like this:
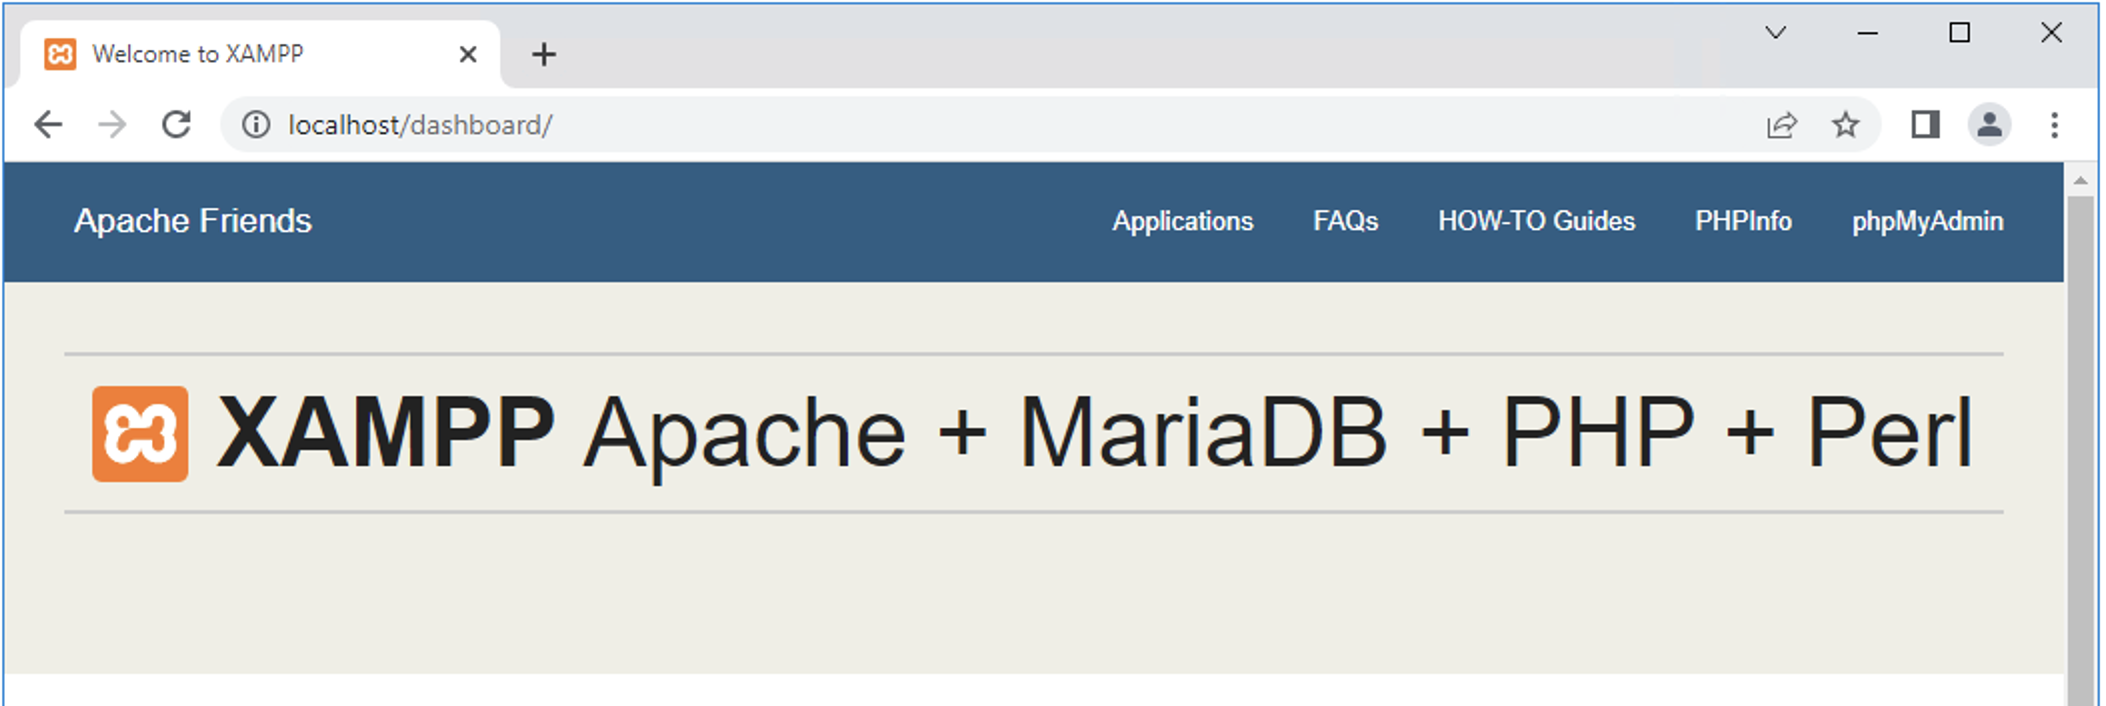
1.6 Check that XAMPP is working by opening your browser and navigating to http://localhost. You should see the XAMPP dashboard.
Note that the webroot of your new http server (http://localhost) is c:\xampp\htdocs.
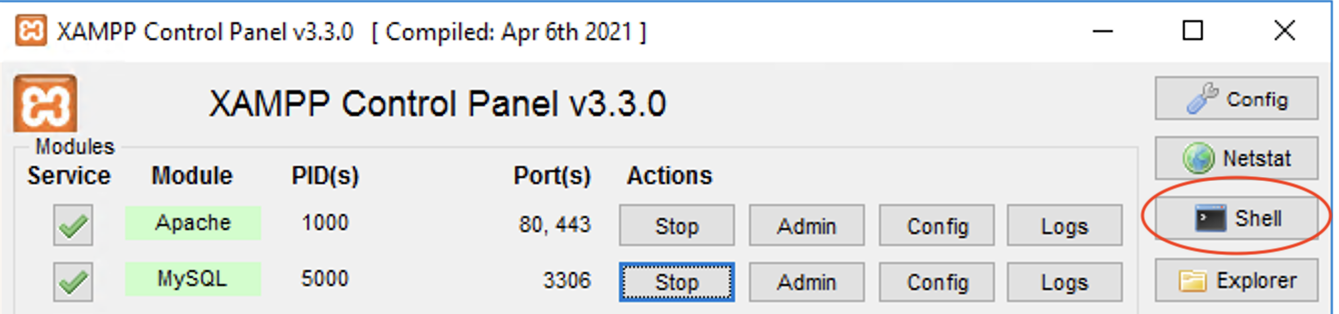
1.7 XAMPP comes by default with MySQL's root user without a password. You should assign this user a password. To do so, click on "Shell" on the XAMPP control panel:
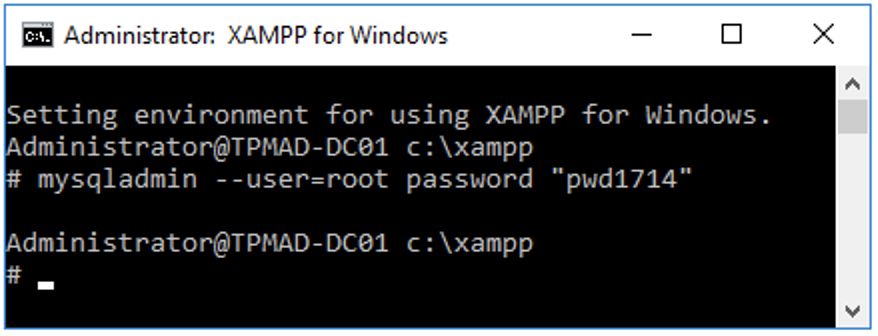
Then set a password for MySQL root with this command:
mysqladmin --user=root password "the_password_for_root"
Change the_password_for_root to your desired password. Example: set password to "pwd1714":
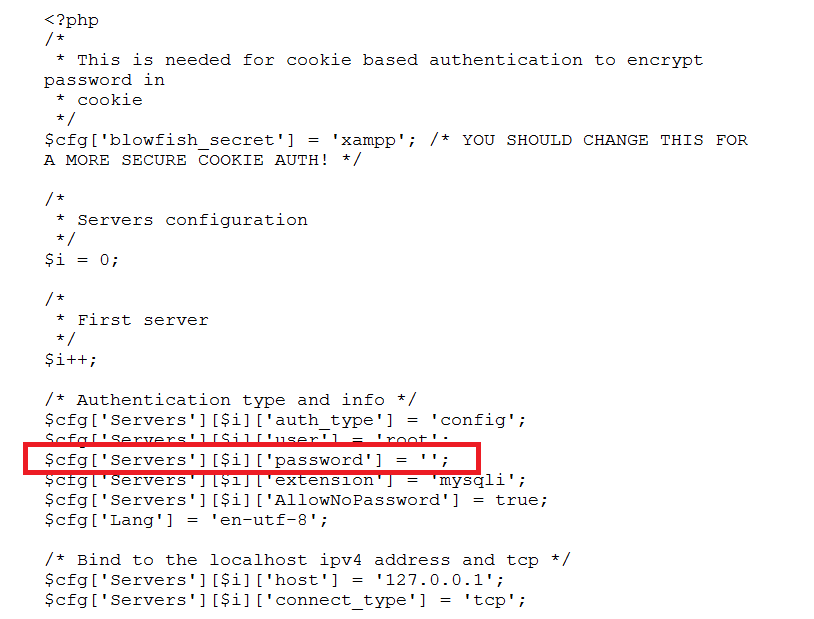
Then enter the password you've just set in the phpMyAdmin configuration file. This file is located at c:\xampp\phpmyadmin\config.inc.php. Edit it with Wordpad and enter the password in $cfg['Servers'][$i]['password'] = '';, like this: $cfg['Servers'][$i]['password'] = 'pwd1714';
2. Installing the SourceGuardian Loader
Team Password Manager is a PHP web application encoded and secured using an encoder (SourceGuardian) and a loader is required to execute it. You need at least version 16.0.0 of the SourceGuardian Loader.
To install the Sourceguardian Loader follow these steps:
2.1 Go to the SourceGuardian Loader Assistant page and follow the instructions. You'll need to access the PHPinfo link in http://localhost/dashboard.
2.2 Restart Apache using the Control Panel
3. Installing Team Password Manager
At this point all the components required to run Team Password Manager are installed. Let's now install Team Password Manager:
3.1 Create the database and user
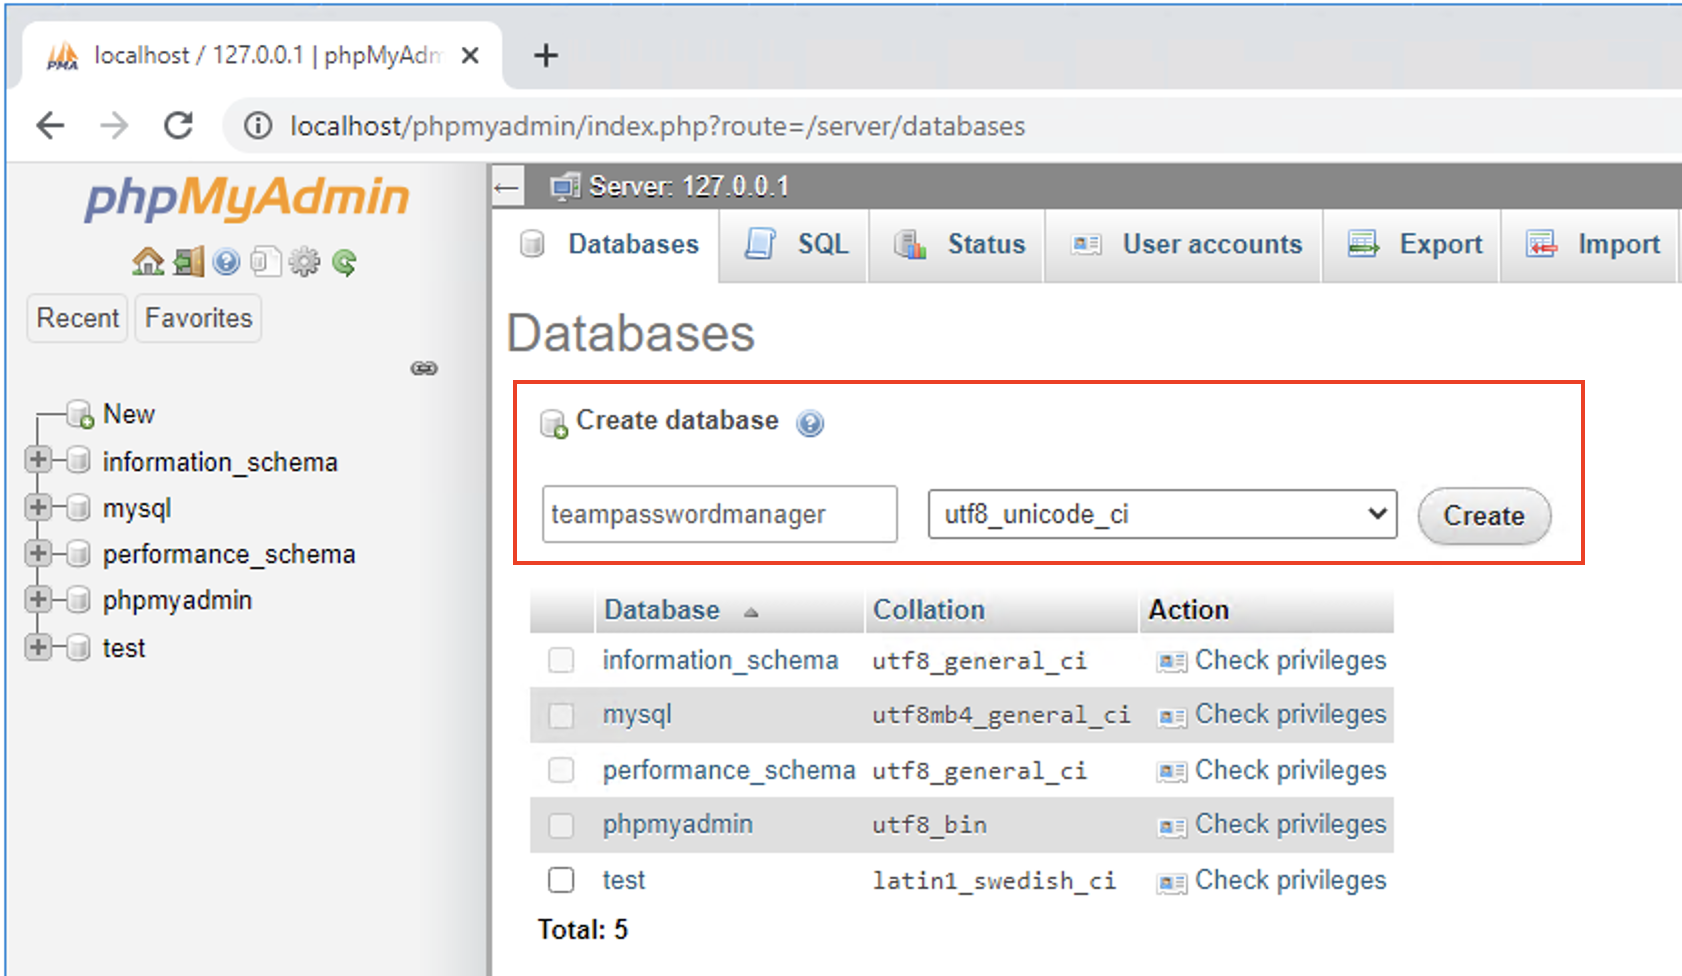
3.1.1 Point your browser to http://localhost/phpmyadmin.
3.1.2 Click on the "Databases" tab.
3.1.3 Enter "teampasswordmanager" below "Create database" and choose the "utf8_unicode_ci" collation, then click "Create":
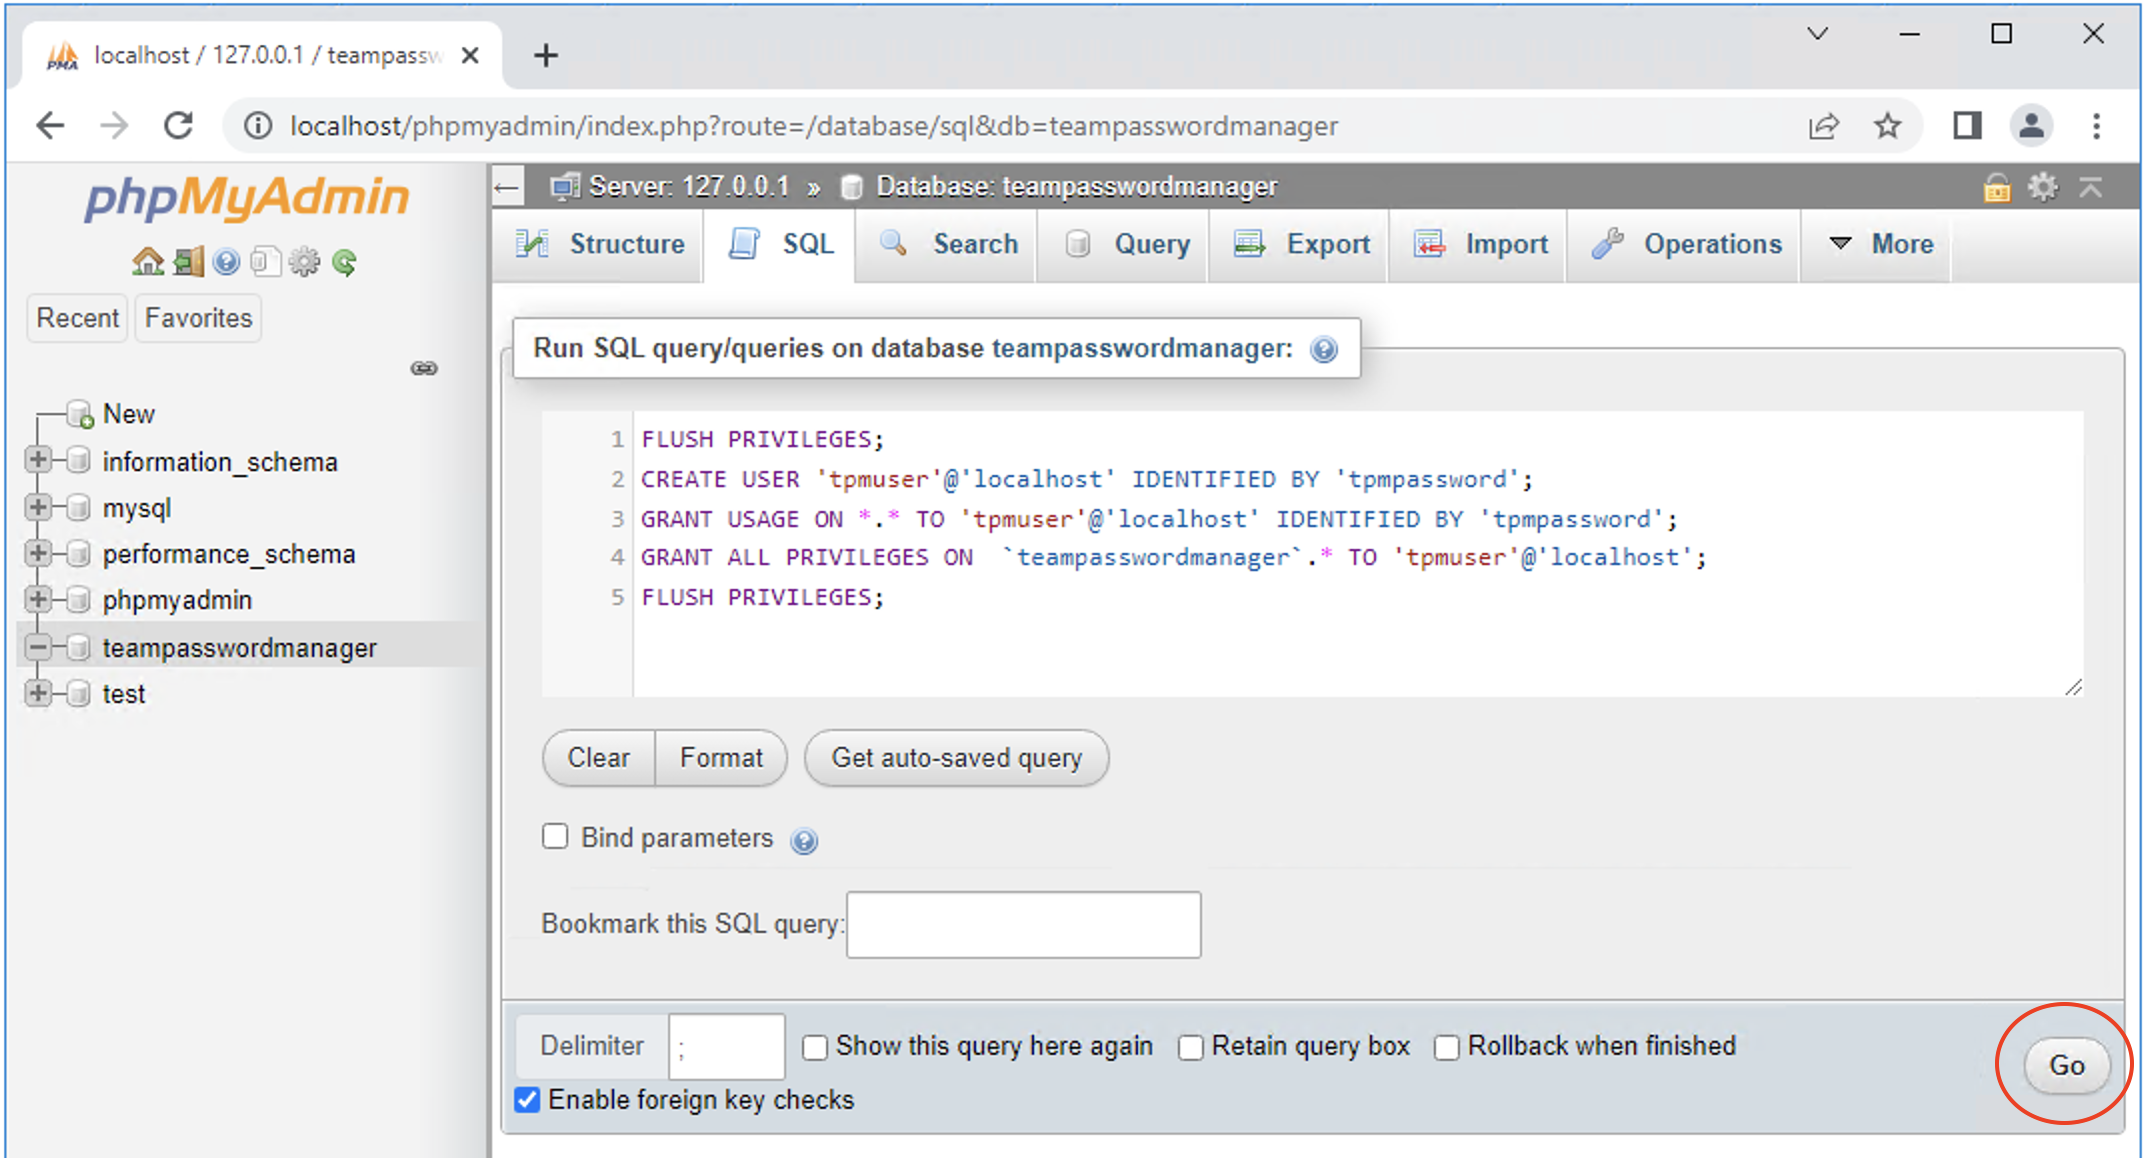
3.1.4 You'll see that the newly created database appears on the left sidebar, click on it and select the "SQL" tab.
3.1.5 We'll create the user "tpmuser" with password "tpmpassword" for Team Password Manager to work with this database: enter the following commands in the SQL tab (better do a copy and paste) and click "Go":
FLUSH PRIVILEGES;
CREATE USER 'tpmuser'@'localhost' IDENTIFIED BY 'tpmpassword';
GRANT USAGE ON *.* TO 'tpmuser'@'localhost' IDENTIFIED BY 'tpmpassword';
GRANT ALL PRIVILEGES ON  `teampasswordmanager`.* TO 'tpmuser'@'localhost';
FLUSH PRIVILEGES;
3.2 Download and copy the Team Password Manager files
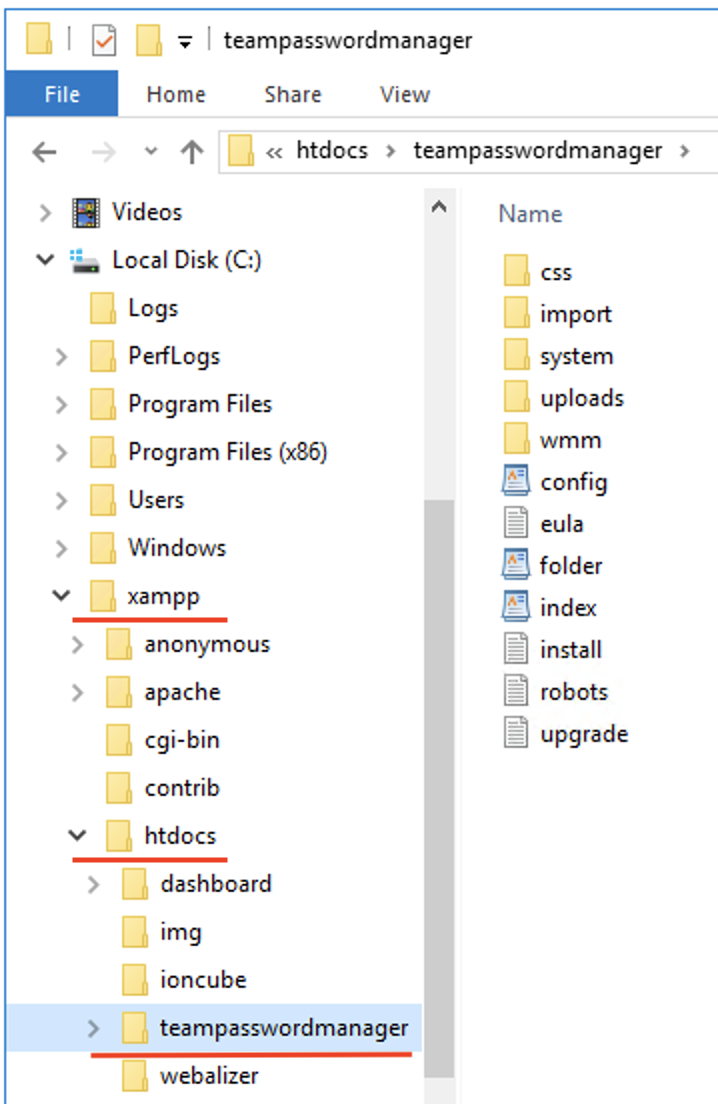
3.2.1 Download the latest version from .
3.2.2 Extract the files into c:\xampp\htdocs\teampasswordmanager:
3.3 Enter database details in config.php
Open config.php using WordPad and replace the following values: CONFIG_USERNAME, CONFIG_PASSWORD and CONFIG_DATABASE:
define('CONFIG_USERNAME', 'tpmuser');
define('CONFIG_PASSWORD', 'tpmpassword');
define('CONFIG_DATABASE', 'teampasswordmanager');
3.4 Execute the install script
3.4.1 Point the browser to: http://localhost/teampasswordmanager/index.php/install
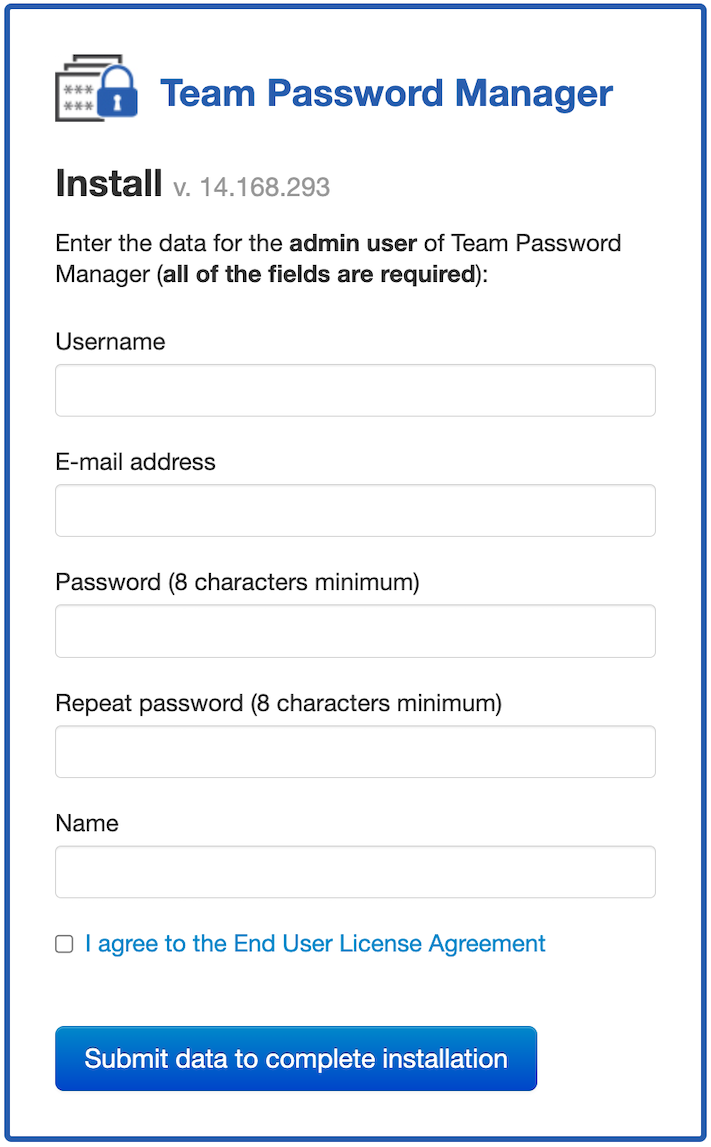
3.4.2 Enter the required fields and click "Submit data to complete installation". If everything is ok, you'll see the following screen:
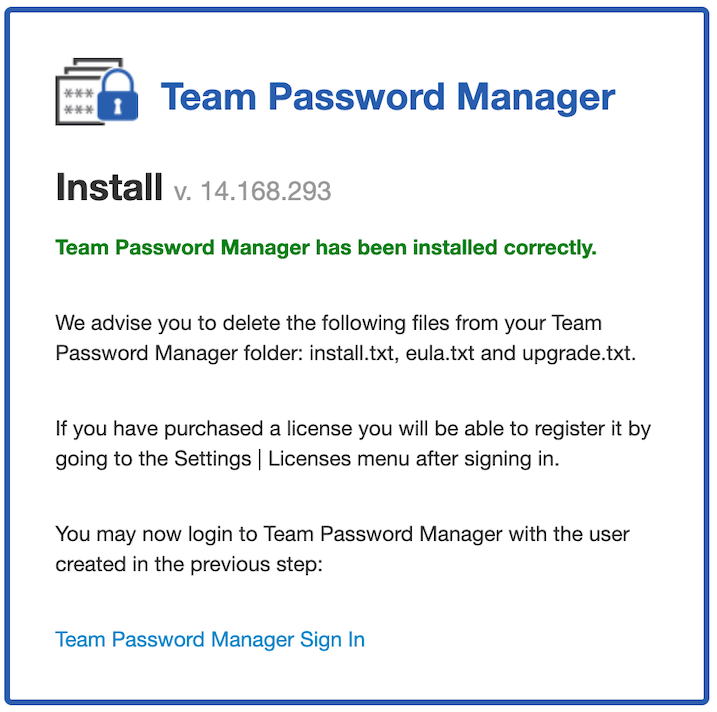
Congratulations, Team Password Manager is installed!
You can now sign in with the username and password just entered. Team Password Manager is free for 2 users and 5 projects, but to fully test it you can get a trial license for 30 days at https://teampasswordmanager.com/trial/.
4. Installing LDAP support in XAMPP
To enable LDAP in XAMPP do this:
4.1 Find and edit C:\xampp\php\php.ini and uncomment this line (delete the semicolon before it): extension=ldap
4.2 Restart Apache.
5. HTTPS and installing an SSL Certificate from a Commercial Certificate Authority in XAMPP
For your users to be able to use https when connecting to your Team Password Manager installation, you must create an SSL certificate and a server private key. XAMPP provides a default certificate and key and https is enabled by default, but it's better to create a new one, and it's even better to get a commercial certificate from a Certificate Authority (CA). Here you have the steps to do so:
5.1 The first thing to do is create a private key and a Certificate Signing Request (CSR) file. The CSR will be used to get the certificate from the CA. To do so:
5.1.1 Create a folder to hold the private key and CSR, and go to that folder on the prompt:
c:\xampp\apache\localcerts
5.1.2 On the prompt, set the following system variable:
C:\xampp\apache\localcerts>set OPENSSL_CONF=c:\xampp\apache\conf\openssl.cnf
5.1.3 Execute openssl to create the private key and CSR:
C:\xampp\apache\localcerts>..\bin\openssl req -nodes -newkey rsa:2048 -keyout myserver.key -out server.csr
When you execute this you'll be required to enter some information that will be integrated into your certificate request. It's specially important that you enter correctly the "Common name", which is the URL you want to use to access your installation of Team Password Manager. In this case we've used xampptest.teampasswordmanager.com (so that we'll use https://xampptest.teampasswordmanager.com to open our Team Password Manager):
Country Name (2 letter code) [AU]:ES
State or Province Name (full name) [Some-State]:Barcelona
Locality Name (eg, city) []:Your city
Organization Name (eg, company) [Internet Widgits Pty Ltd]:Team Password Manager
Organizational Unit Name (eg, section) []:Testing
Common Name (e.g. server FQDN or YOUR name) []:xampptest.teampasswordmanager.com
Email Address []:info@teampasswordmanager.com

Please enter the following 'extra' attributes
to be sent with your certificate request
A challenge password []:
An optional company name []:
This creates a two files, myserver.key and server.csr.
myserver.key is the private key, and you should protect it and not disclose it to anyone. server.csr is the CSR file. You'll be required to copy and paste its contents into the online enrollment form when requesting the certificate.
5.2 Purchase the certificate from a Commercial Authority. We've used Namecheap (PositiveSSL certificate) but you can use any CA that you like. As outlined before, you'll need to copy the information in the CSR file (everything from -----BEGIN CERTIFICATE REQUEST to END CERTIFICATE REQUEST-----) and paste it on the indicated form. You'll also need to validate your domain, the CA will provide various methods for doing so.
The CA will then provide you with two files (the certificate): yourDomainName.crt and yourDomainName.ca-bundle.
Do this:
Copy yourDomainName.crt and yourDomainName.ca-bundle to this folder c:\xampp\apache\conf\ssl.crt.
Copy myserver.key to this folder c:\xampp\apache\conf\ssl.key.
5.3 Edit the Apache SSL configuration file at c:\xampp\apache\conf\extra\httpd-ssl.conf. Find the following directives and assign the correct file paths of the new certificate, ca-bundle and the private key (if any of these directives is commented with #, uncomment it):
SSLCertificateKeyFile c:\xampp\apache\conf\ssl.key\myserver.key
SSLCertificateFile c:\xampp\apache\conf\ssl.crt\yourDomainName.crt
SSLCertificateChainFile c:\xampp\apache\conf\ssl.crt\yourDomainName.ca-bundle
Change DocumentRoot to the Team Password Manager folder: DocumentRoot "C:/xampp/htdocs/teampasswordmanager". This will make https://xampptest.teampasswordmanager.com open Team Password Manager, not the XAMPP dashboard.
Change ServerName value to the new domain: ServerName xampptest.teampasswordmanager.com:443
Save the changes and restart Apache.
Now your XAMPP Team Password Manager server has support for https with a commercial certificate. The following steps are optional and they depend on the configuration and location of your server. They are basically provided as a reminder:
5.4 Have your domain point to your Team Password Manager server. We want https://xampptest.teampasswordmanager.com to reach our server. To do so, go to your DNS management system and add the IP address of the server (here 1.2.3.4 is used as an example) to the DNS: xampptest A 1.2.3.4. Please check your DNS documentation for doing so. Note that if your server is not publicly accessible you must provide the IP address of your router and direct http (port 80) and https (port 443) traffic to your server.
5.5 You may need to set an inbound rule for http (port 80) and https (port 443) traffic in Windows Firewall in your server. To do so:
5.5.1 Open Windows Firewall and click on "New Rule...".
5.5.2 Select "Port" as Rule Type.
5.5.3 In Protocols and Ports, select "TCP" and enter "80,443" in Specific local ports (we're opening both http and https ports).
5.5.4 Select "Allow the connection" as Action.
5.5.5 Check Domain, Private and Public as Profile.
5.5.6 Set a name for the rule and finish.
5.6 Redirect http traffic to https, so that if http://xampptest.teampasswordmanager.com is entered, it will be automatically redirected to https://xampptest.teampasswordmanager.com (note the s in https). To do so, create a .htaccess file in c:/xampp/htdocs/teampasswordmanager with the following contents:
SSLRequireSSL
ErrorDocument 403 https://xampptest.teampasswordmanager.com
Document changelog
| Mar 12, 2025: | Updates for version 14.168.293: PHP 8.0-8.4, Sourceguardian Loader 16.0.0 |
| October 25, 2023: | Document created, replacing the 2022 one. |