This document explains how users and groups work in Team Password Manager. It's divided into the following sections:
- Users overview
- Types of users (regarding authentication)
- User roles
- Properties of a user
- Active and Inactive users
- Licensing
- Adding users
- Other operations on users
- Deleting a user
- Other settings that affect users
- Email configuration
- Two-factor authentication
- Remember me
- Password reset
- User password rules
- IP address blocking
- Timeout and auto-logout
- Maintenance mode
- Users and the API
- Groups
- Permissions
Users overview
To be able to use Team Password Manager, you need to log in (or sign in) with a user.
During the installation of Team Password Manager, the first user, an user with "Admin" role, is created. This user can create other users so that other persons can use Team Password Manager to manage passwords and other related data.
User management is done in the "Users" tab, which is accessed through the "Users / Groups" option in the top menu. This option is only available to users that have role "Admin" or "IT" (more on roles later). Clicking this option opens the Users screen:
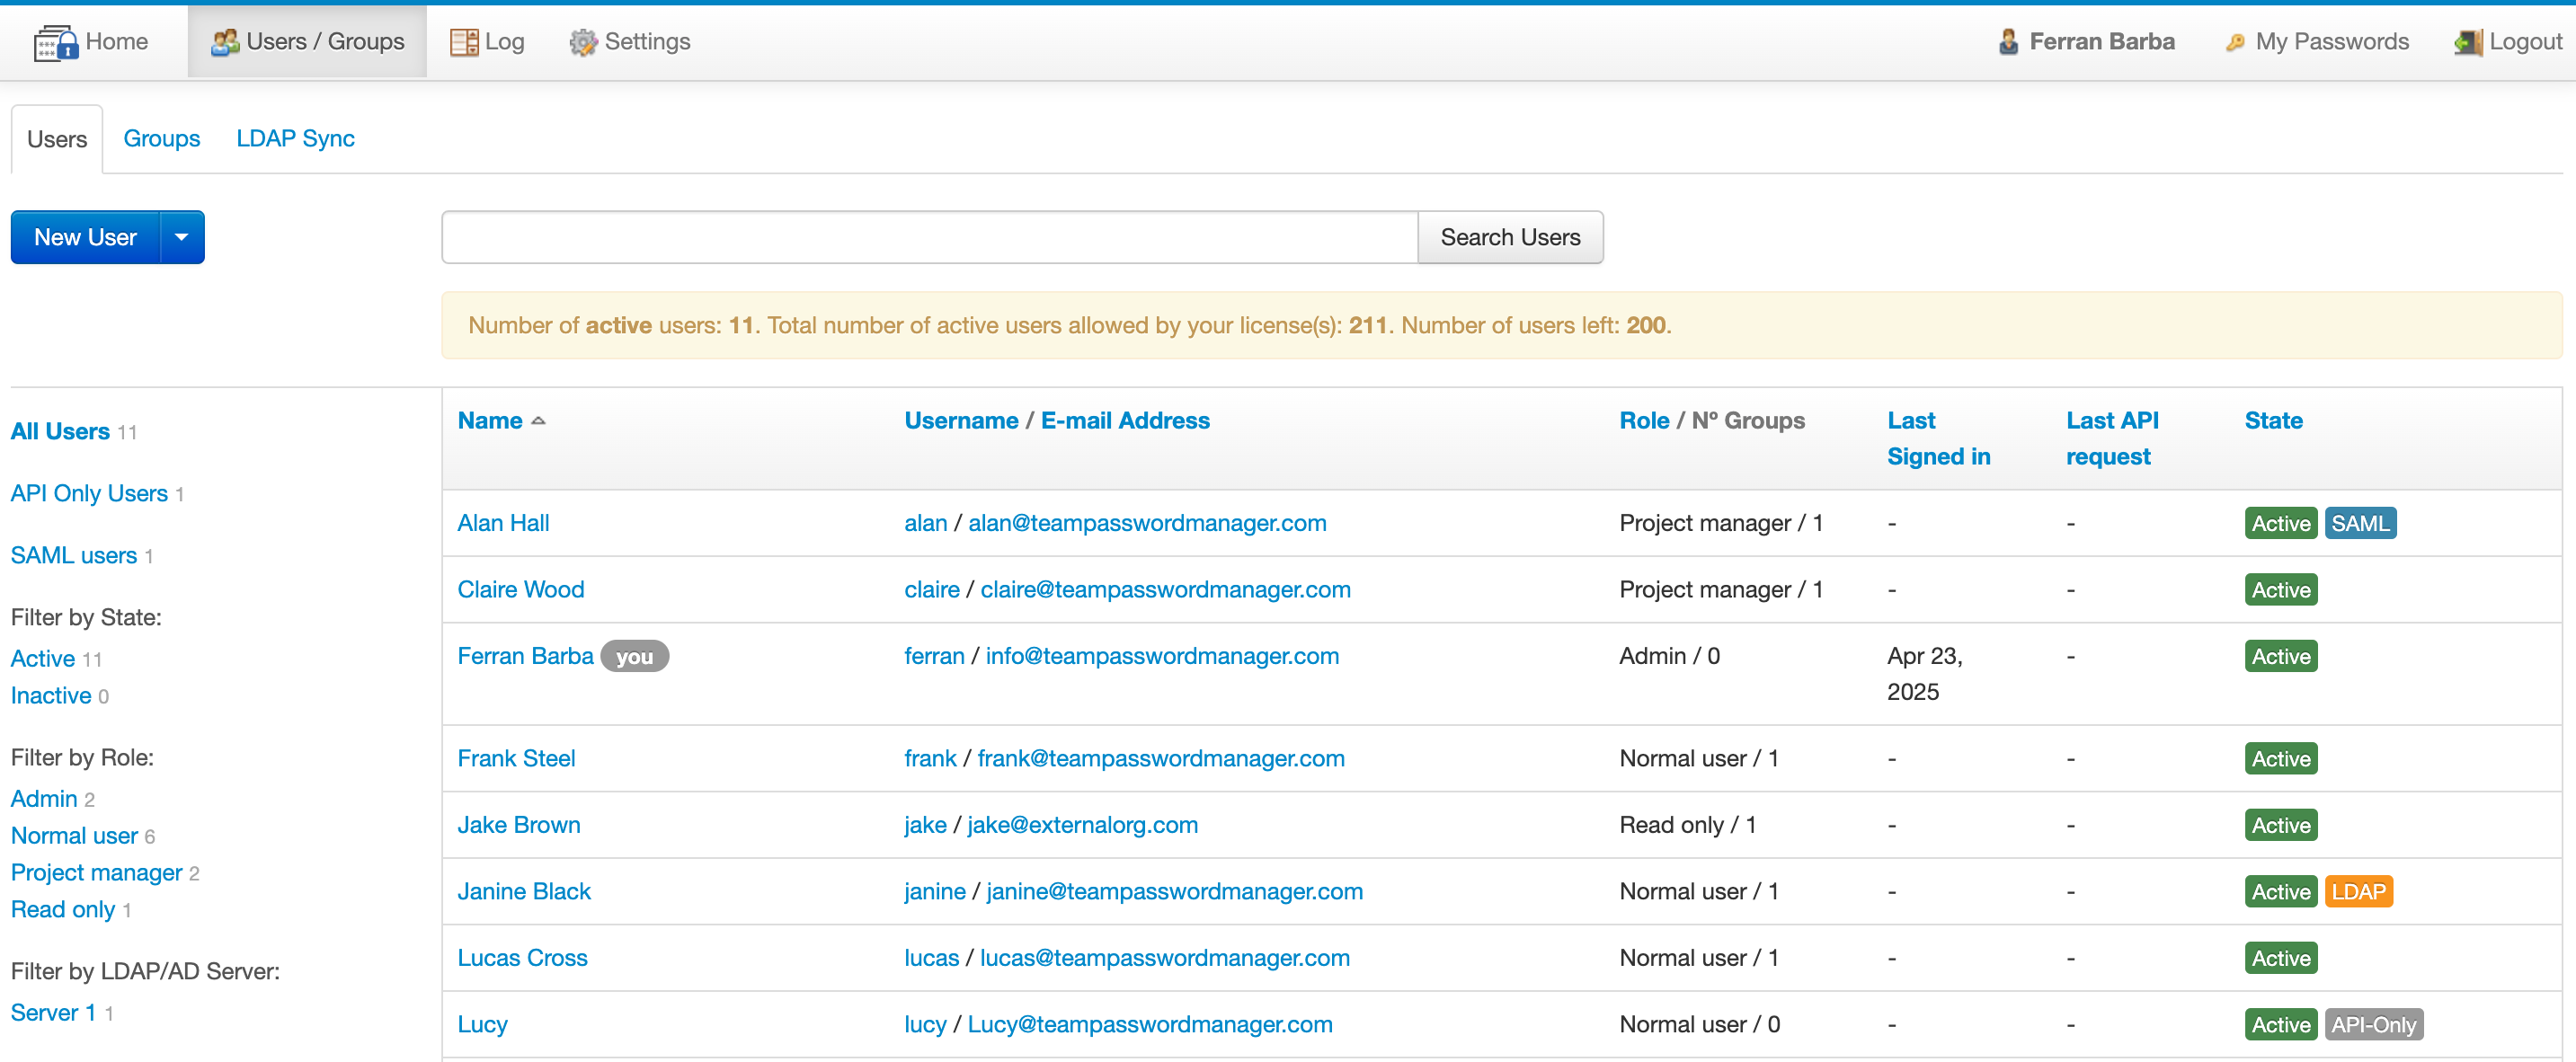
The Users screen shows the registered users in the system, which you can search using the search box or filter using different criteria on the left sidebar.
Clicking on a user in the list opens the user screen, that shows the properties of the user and the different actions you can perform on it:
Types of users (regarding authentication)
There are three types of users in Team Password Manager, depending on the authentication method they use:
- Local users (also referred to as Normal users): they authenticate against the Team Password Manager database, with a username and password.
- LDAP users: they authenticate against an LDAP server. They use the username registered in Team Password Manager and the password from the LDAP system. The Login DN of the user in the LDAP server is registered in Team Password Manager to be able to make the connection.
- SAML users: they use a SAML Identity Provider to authenticate, with the email address registered in Team Password Manager.
Regardless of the type of user, a user needs to exist in Team Password Manager to be able to log in. Example: a user can exist in the LDAP server of a company, but if it's not created in Team Password Manager referencing the LDAP user in the LDAP server (via the Login DN), the user will not be able to log in to Team Password Manager.
Important: LDAP and SAML authentication rely on external systems to log in users. These external systems or their connections from Team Password Manager can sometimes fail. So, if your primary means of authenticating Team Password Manager users is LDAP or SAML, we advise to always have a local user of role "Admin" or "IT". This way, if the LDAP or SAML authentication fails for whatever reason, you'll always be able to log in and change the appropriate settings.
You have more information on LDAP and SAML users in the following documents:
User roles
Each user in Team Password Manager has a role that defines what the user can do. There are five possible roles:
- Admin: can do anything.
- Normal user: work with passwords and projects, but not create/delete projects.
- Project manager: like normal users and also create/delete projects.
- IT: like a project manager plus access to users/groups, log and settings.
- Only read: only read passwords on assigned projects.
We have a document that explains them in detail: User roles.
Properties of a user
A user in Team Password Manager has the following basic properties, all of which are required:
- Username: identifies the user in the system, and it's used to log in for local and LDAP users. Usernames cannot be repeated.
- E-mail address: the email address of the user. It's used for notifications and to log in for SAML users. E-mail addresses cannot be repeated either.
- Password: only for local users. The password of a user cannot be empty and must follow some rules (length, types of characters), which you can set in Settings | User Password Rules.
- LDAP server and Login DN: only for LDAP users. These fields link the Team Password Manager user with the user in the LDAP server.
- Name: the name of the person that uses the user. It cannot be empty.
- Role: see the previous section.
- Can create projects in root (yes/no): only for "Project Manager" or "IT" roles. This option gives (or not) permission to the user to create projects in the root of the projects tree.
You can see all of these properties in the user screen, from which you can also change some of them (by Editing the user).
A user has other data which you, as an administrator, may not be able to see or change. For example: two-factor authentication settings or personal passwords.
Active and Inactive users
Active users can log in to Team Password Manager and work with it.
Inactive users cannot log in to Team Password Manager and cannot work with it.
Users are active by default and you can deactivate them at any time, and re-activate them later. Inactive users do not count towards licensing, as we will see in the next section.
Licensing
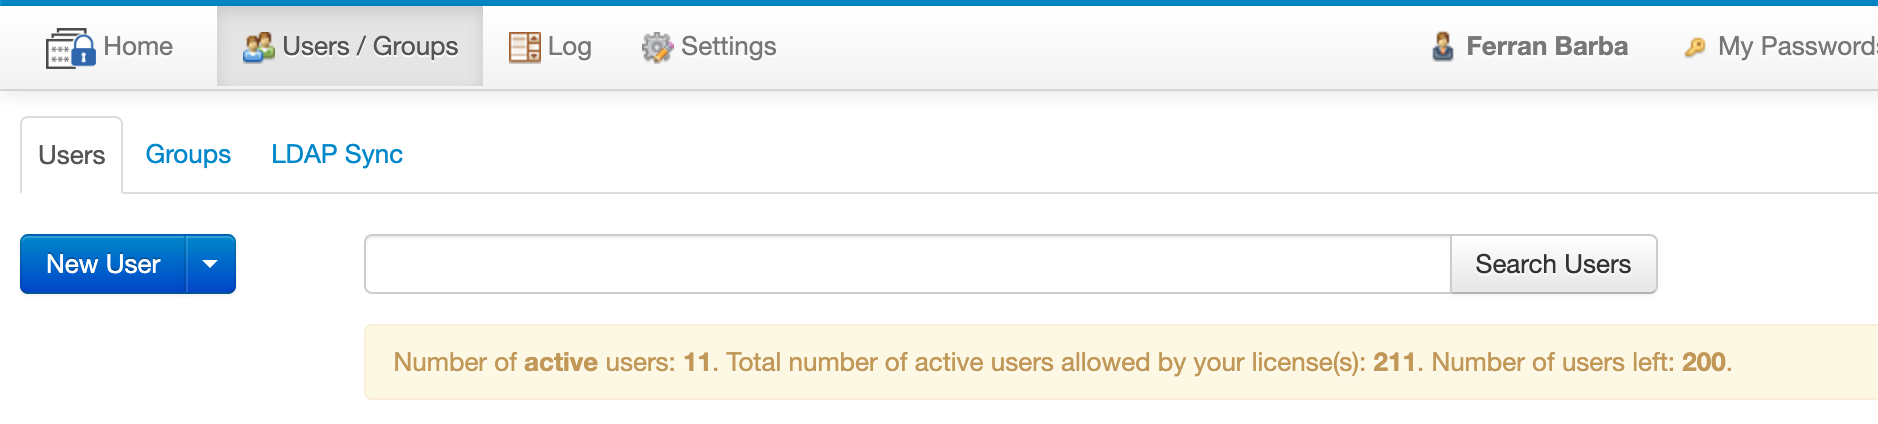
Unless your installation of Team Password Manager has an Unlimited users license, you're allowed a maximum number of active users. This maximum number of active users is shown in the Settings | Licenses screen and also in the Users screen, below the users search box:
The maximum number of active users your installation can have is the sum of the number of users of all the valid licenses your installation has. Example: there are 2 licenses: a 50 users license and a 10 users license. In this case, the maximum number of active users the installation can have is 60.
Adding users
There are many ways to add users to your installation of Team Password Manager: manually, importing LDAP users, syncing LDAP users, provisioning SAML users via LDAP and using the API. In this section we'll see the manual way. To learn about the other ways see the following documents:
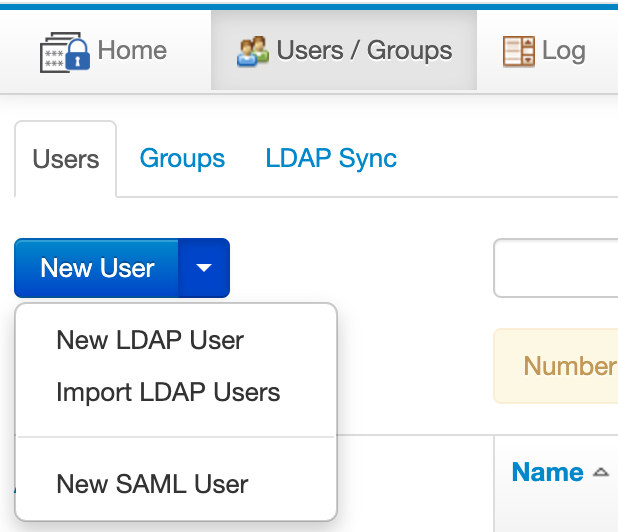
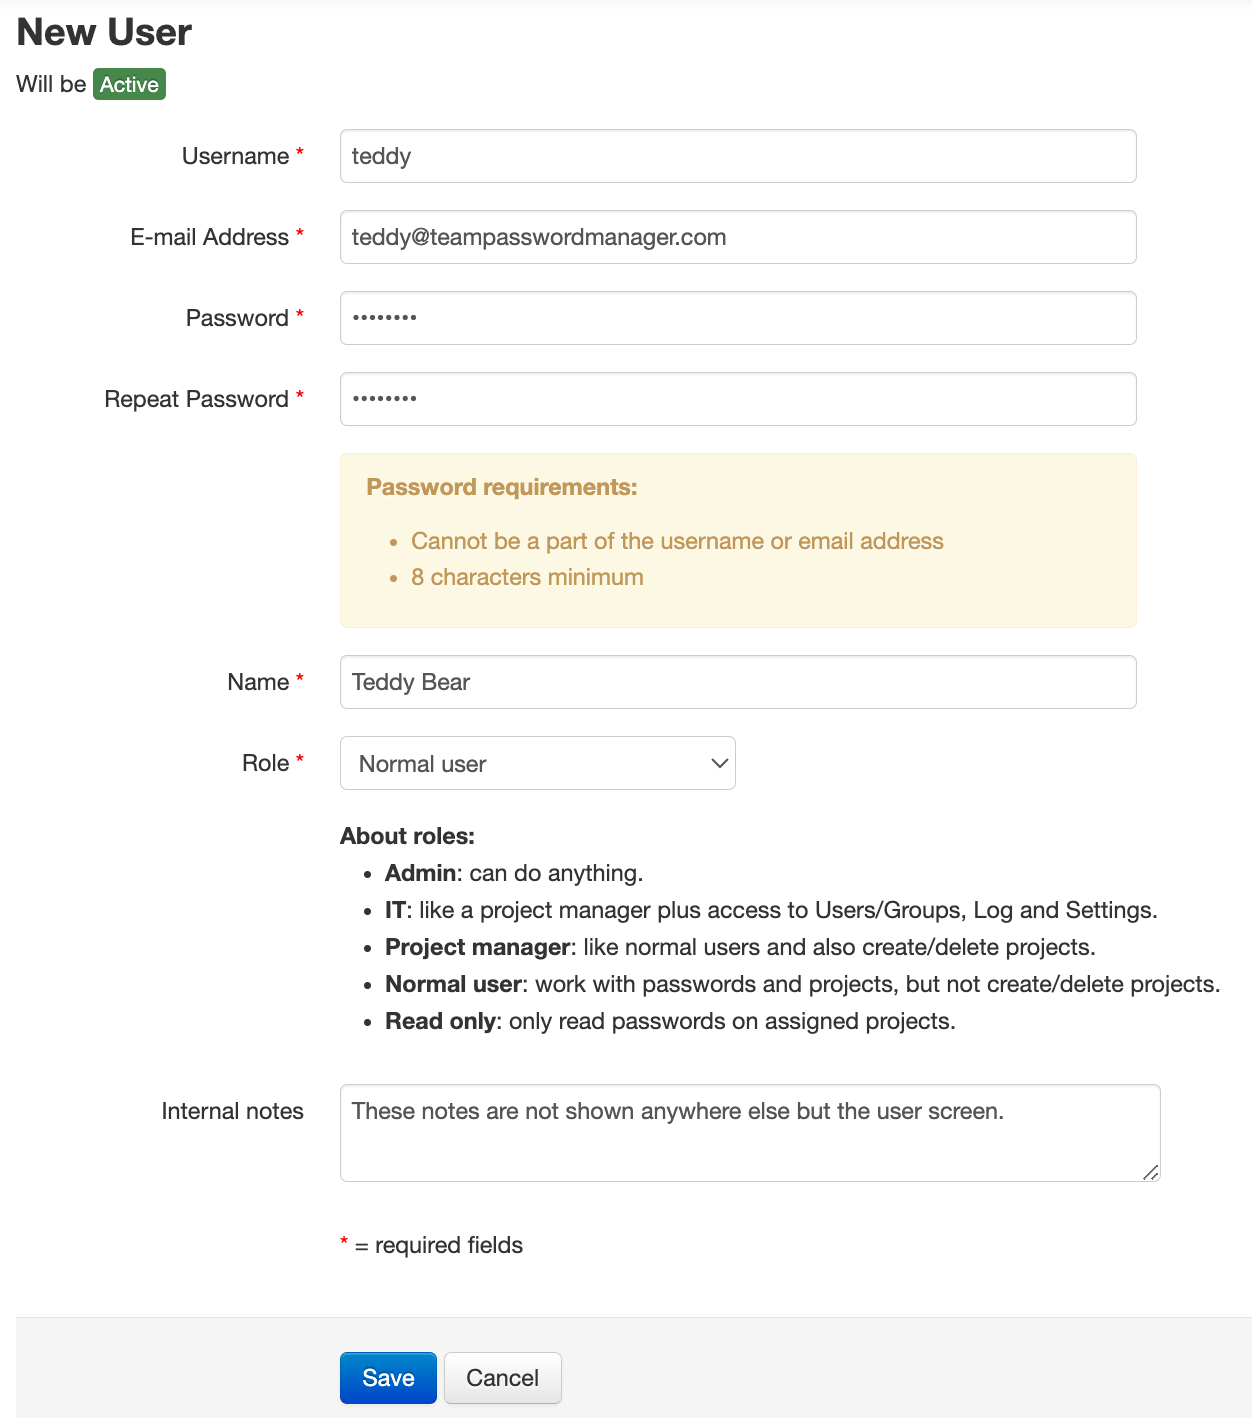
Manually adding users in Team Password Manager is easy: select the "Users / Groups" option in the top menu and, in the "Users" tab, click the "New User" button. This will add a local user. If you want to add an LDAP or SAML user instead, click on the New User dropdown button and select the appropriate option, as seen on this screenshot:
Once you click the appropriate button, the New User screen is shown and you can enter the required fields to create the user. Click Save to confirm the creation of the user:
Other operations on users
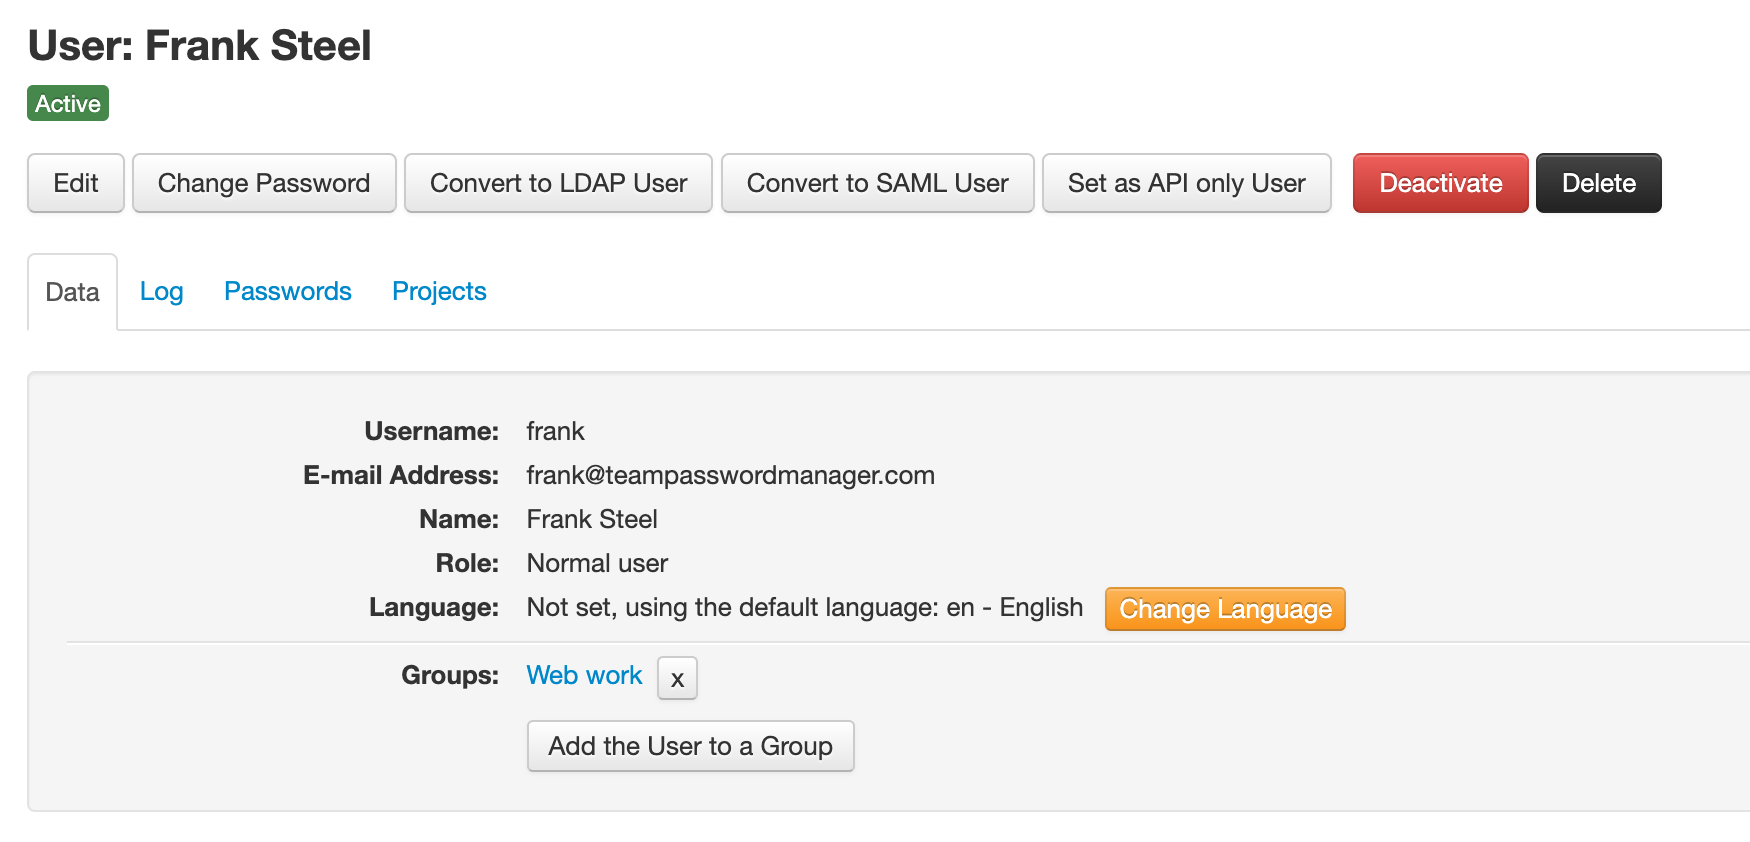
From the user screen you can perform other operations on a user, via the buttons or tabs:
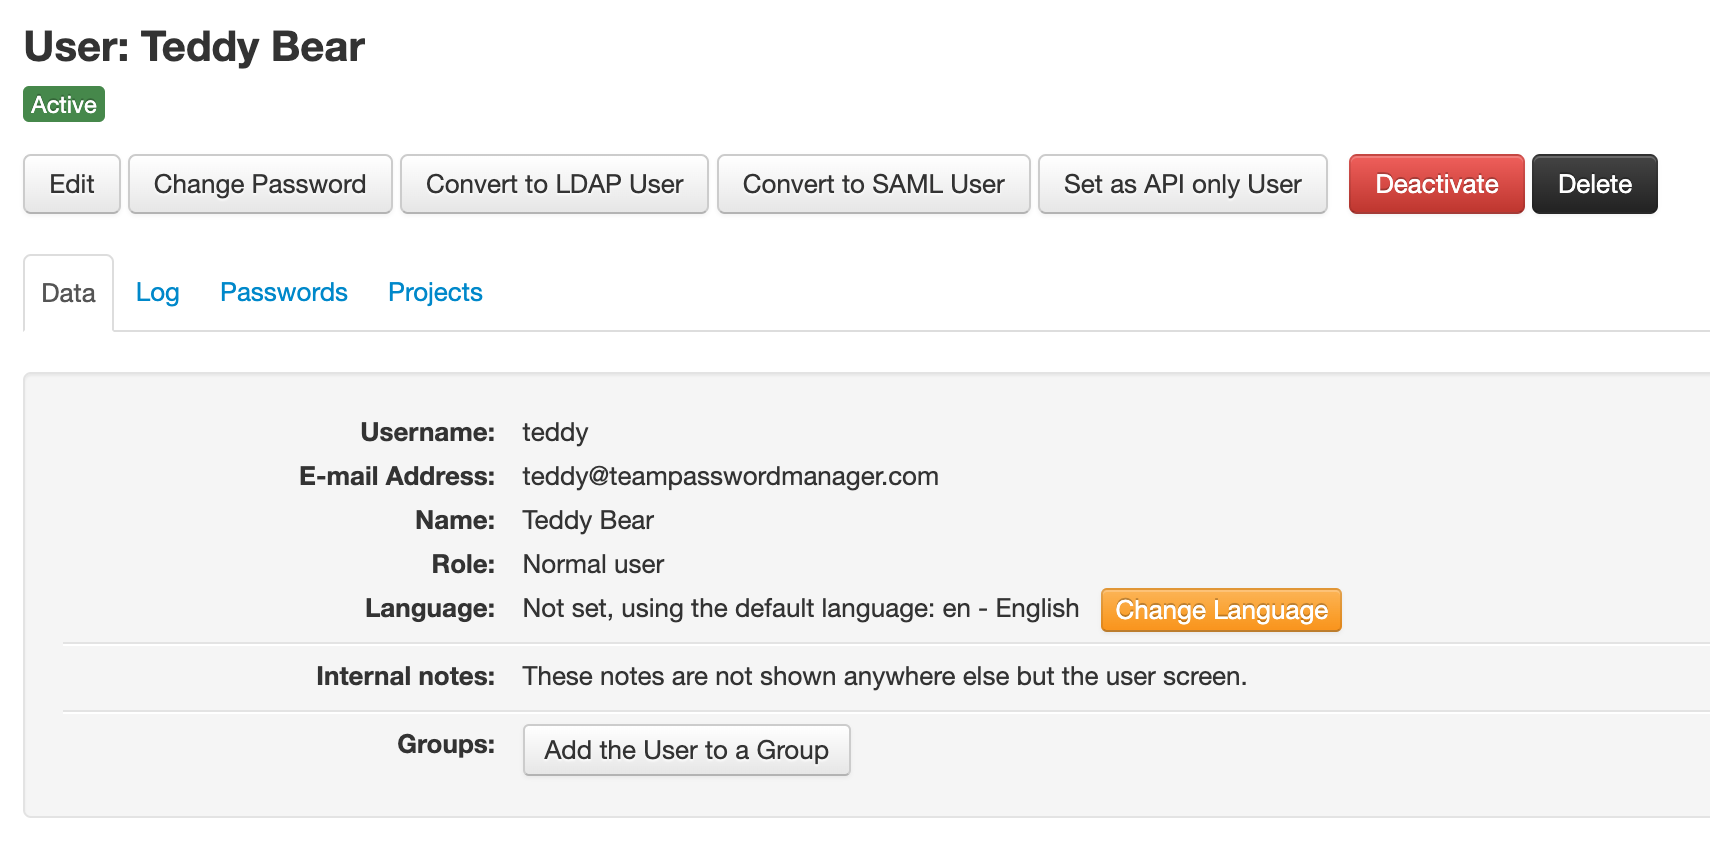
Here's a list of the operations you can do on a user:
- Edit: change the user information. It opens a similar screen as the New User one.
- Change password: only for local users. Note that users can also change the password themselves.
- Convert to LDAP user: convert a local user to an LDAP user.
- Convert to SAML user: convert a local user to a SAML user.
- Convert to normal user: convert an LDAP or SAML user to a local user.
- Set/Unset as API only user: only for local or LDAP users. API only users can only log in using the API, they're only used for API operations. See the API section below for more information.
- Activate / Deactivate: activate or deactivate the user.
- Delete: delete the user. See the next section.
- Disable two-factor authentication: the user can enable two-factor authentication (you cannot do it for the user). But you can disable it with this option.
- Add the user to a group: add the user to a group, see the groups sections below.
- Change Language: change the language of Team Password Manager for the user. Note that the users themselves can also do this.
- Log tab: see the log entries the user has generated.
- Passwords tab: see the passwords the user has access to.
- Projects tab: see the projects the user has access to.
Deleting a user
There are three ways of deleting a user: 1) manually clicking the "Delete" button on the user screen, and confirming the action, 2) for LDAP users, using a LDAP sync object of type delete users object, and 3) Using the API.
Important: when a user is deleted, all the user data is gone. There's no trash bin for users. This includes the user's personal passwords and permissions on passwords and projects. The only information that is not deleted when deleting a user is the log entries that the user has generated.
Other settings that affect users
Email configuration
Team Password Manager can send email to its users for various reasons: notifications, password reset and others. For these features to properly work, email must be correctly configured. Learn how to do it in this document:
Two-factor authentication
Local and LDAP users can enable two-factor authentication in their account. They also can manage their two-factor authentication settings (renew, disable). You, as the users manager, can disable two-factor authentication for them. Also note that two-factor authentication can be enforced on all users. Check the following two-factor authentication documents for more information:
- Two-Factor Authentication in Team Password Manager
- How to enable Two-Factor Authentication for a user
Remember me
Local and LDAP users can click on the "Remember Me" checkbox in the sign in screen so that their credentials are remembered for a number of days (30 by default). The following document explains the settings around this feature:
Password reset
Local users can reset their password if they've forgotten it with the "Forgot your password?" link in the Sign in screen. Check the following document to see how it works and the options around it:
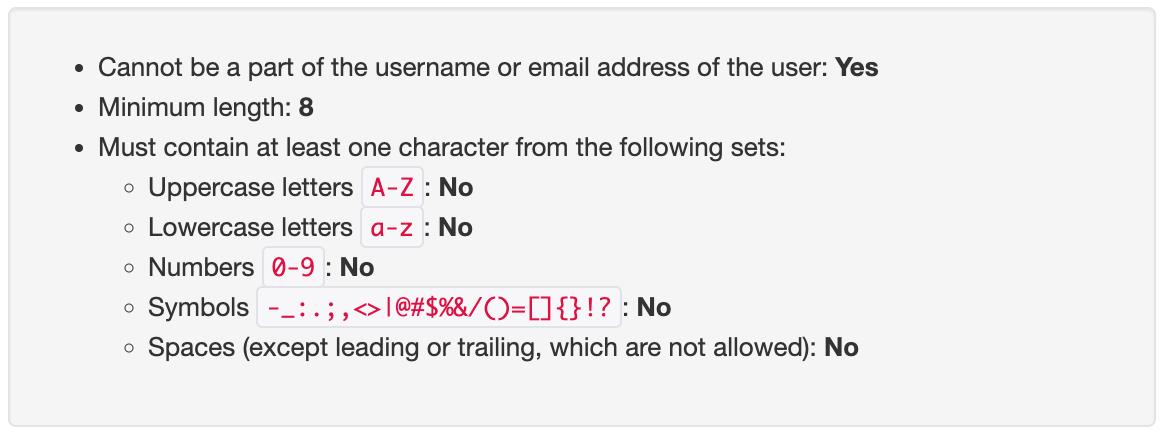
User password rules
You can define the password rules for local users in Settings | User Password Rules. The following screenshot shows the available options:
IP address blocking
Team Password Manager has a system to prevent brute force attacks on the log in screen. Read about it here:
Timeout and auto-logout
Inactive session duration (the amount of time the user is logged in but not interacting with the software) is configurable in Team Password Manager. See how to do it here:
Maintenance mode
Maintenance Mode is a state in Team Password Manager in which no one can work with the software. Learn more about it here:
Users and the API
The use of the API by users is regulated by the security settings in Settings | API, which can be: 1) All of the users access the API, or 2) Only API Only users access the API. Learn more about the API in these documents:
Note that two factor authentication is not available in the API.
A local or LDAP user can be set as API Only user. API Only users can only use the API, they cannot log in the web app. They're meant only for API processes.
Users can also be managed with the API via the users objects, described here: API Users.
Groups
Groups overview
Groups are groups of users to which you can assign permissions as a whole. See the Permissions section at the end of this document to learn more about permissions.
Groups are managed in the Groups screen, which can be accessed from the "Users / Groups" option in the top menu, and then clicking on the "Groups" tab:
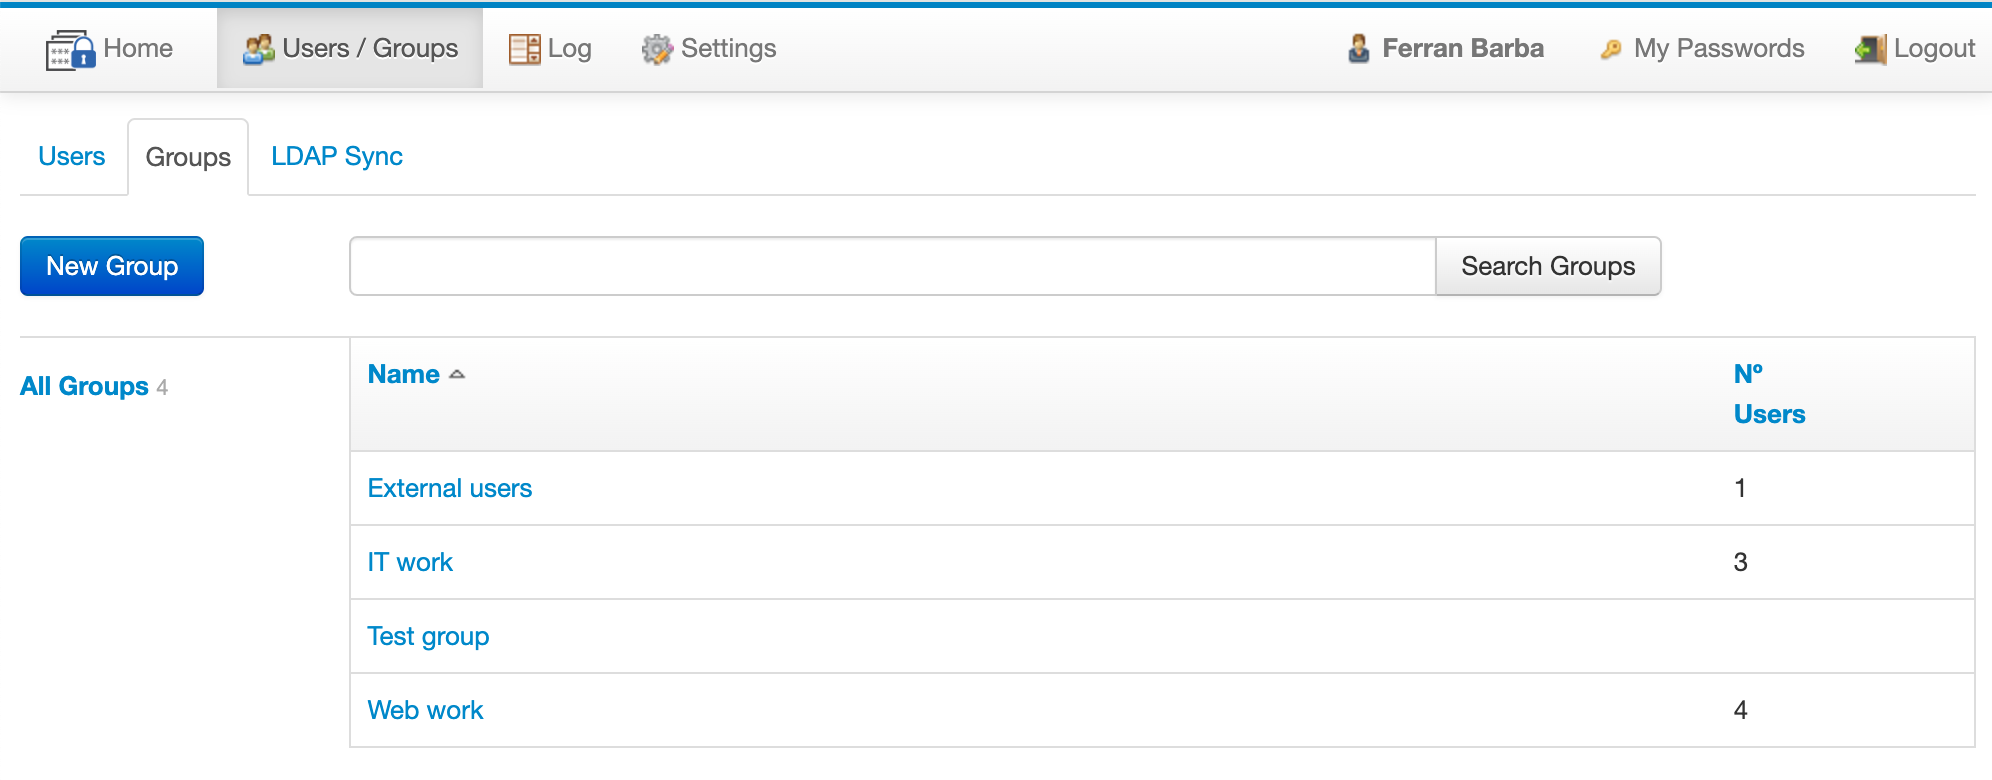
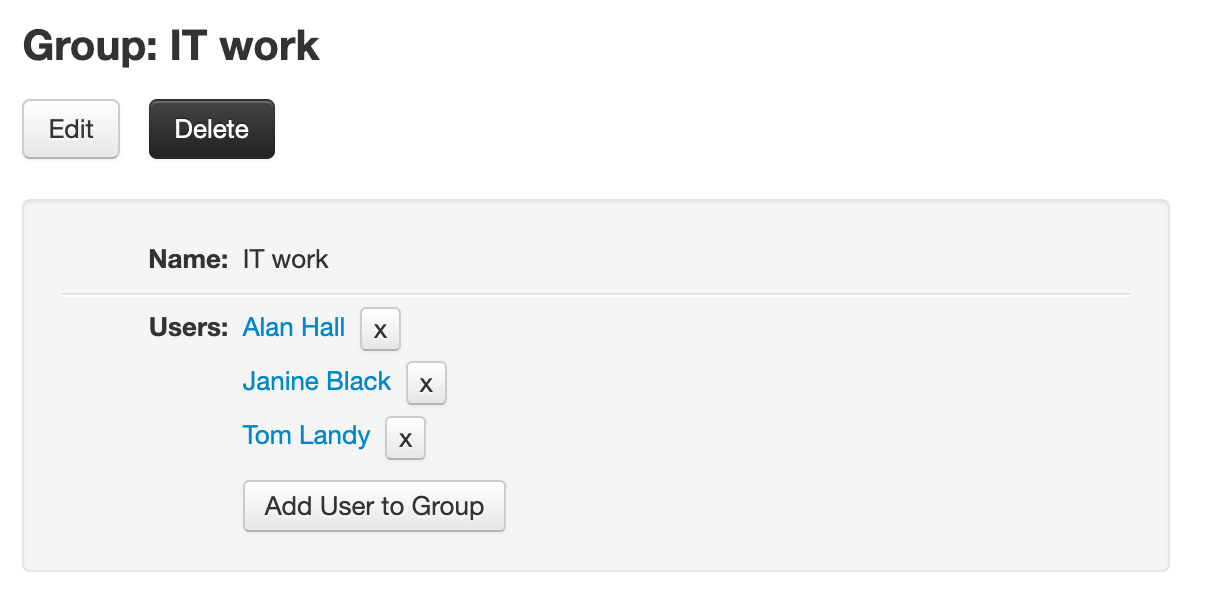
The functionality of this screen is similar to the users one. Clicking on a group in the list will open the group screen:
To create a new group just click on the "New group" button and fill in the name of the group.
In the group screen you can add or remove users to/from the group, rename the group or delete it. You can also add a user to a group from the user screen.
Types of groups
There are two types of groups:
- Local groups: these are the groups you create and manage as we've seen in the previous section.
- LDAP groups: these groups are created through LDAP sync, using Add/update groups and sync members LDAP sync objects. You cannot create LDAP groups manually, but you can delete them. Also, members of these groups are added or removed only via LDAP sync, using the mentioned object. LDAP groups are identified with the LDAP label.
Groups in the API
Local groups and group membership can be managed with the API with the groups objects. See them in detail here:
Permissions
Access and permissions can be assiged to objects (passwords and projects) for users and groups. Note that from the point of view of permissions, the types of users (local/LDAP/SAML) or groups (local/LDAP) are the irrelevant. So, you can assign permissions regardless of the type.
The document that describes permissions is the following one:
Document changelog
| Apr 25, 2025: | Document created |