SAML Authentication
Current Team Password Manager version: 14.190.309Beginning in version 9.125.225, Team Password Manager allows users to authenticate against a SAML 2.0 Single Sign-on Identity Provider (IdP). Security Assertion Markup Language (SAML) is a standard for exchanging authentication and authorization information between an Identity Provider (IdP) and a Service Provider (SP). An Identity Provider, such as OneLogin, Google or Azure to name a few, stores users and provides authentication to a Service Provider, in this case Team Password Manager, who needs users to operate. SAML also allows web browser Single Sign-on (SSO), which basically allows a user to only authenticate against one Identity Provider and automatically be able to log in to many Service Providers.
This document explains everything you need to know about SAML SSO authentication in Team Password Manager. Here are the main sections:
- Introduction: how SAML authentication works in Team Password Manager
- Requirements
- Enabling/disabling SAML
- Configuring SAML
- Configuring the Sign In Screen
- SAML users
- SAML Settings Reference
Ensure that the server hosting Team Password Manager has NTP (time synchronization) enabled.
Even small clock differences between the server and the Identity Provider can cause login failures.
Introduction: how SAML authentication works in Team Password Manager
After configuring SAML in Team Password Manager and in the Identity Provider (see the Configuring SAML section) you need to create SAML users. SAML users are users in Team Password Manager that can authenticate using SAML. Their most important property is their email address, which is the field that "links" them to the Identity Provider. Read more about SAML users below.
If SAML Authentication is enabled and configured, and there are active SAML users, the sign in screen will show the "Sign In via SAML" link:
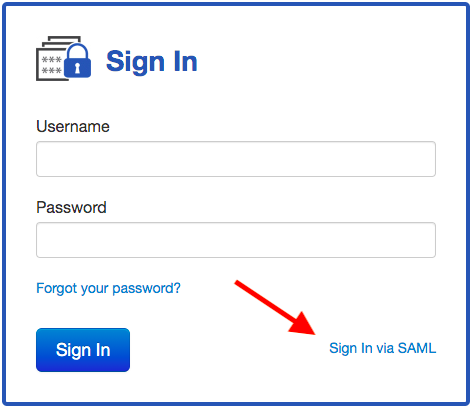
When a user clicks the "Sign In via SAML" two things can happen:
- If the user is already logged in to the Identity Provider, the user will be automatically logged in to Team Password Manager.
- If the user is not logged in to the Identity Provider, the Identity Provider's sign in screen will appear. The user will then log in to the Identity Provider and, if authentication is successful, then the user will be automatically logged in to Team Password Manager.
Once the user has finished working in Team Password Manager and logs out, the following happens:
- If the Single Logout Service URL of the Identity Provider is set (see Identity Provider Settings below), the user will be logged out of the Identity Provider. Note that not all of the Identity Providers support this.
- The user is logged out of Team Password Manager.
Requirements to be able to use SAML
SAML requires the following PHP extensions or modules to work: xml, date, zlib, openssl and curl. If any of them are missing Team Password Manager will tell you and you won't be able to use SAML until you install them.
Enabling and disabling SAML
SAML is disabled by default. To enable it, go to the "Settings" option in the top menu, then click on the "SAML Authentication" option in the sidebar and finally on the "Enable SAML authentication" button. After enabling SAML you'll see all the SAML settings, discussed in a later section.
To disable SAML, just click on the "Disable SAML authentication" button. When you do this the settings section disappears but the settings are not deleted, they're simply hidden.
Disabling SAML will prevent SAML authentication from working and will not allow you to create SAML users. Existing SAML users will remain as such but will not be able to sign in to Team Password Manager.
Configuring SAML
Before being able to use SAML authentication in Team Password Manager, you need to configure it. To do so, follow the next steps.
Note: the steps are basically the same for all Identity Providers, but some terminology may be different. If you're using Google, Microsoft Azure Active Directory, Okta or OneLogin as Identity Providers, check their specific tutorials instead:
- Create a new app in your Identity Provider called Team Password Manager (or your name of choice).
- Copy the Identity Provider SAML details to Team Password Manager: locate the following values in your Identity Provider and enter them in the "Identity Provider Settings" in Settings | SAML Authentication in Team Password Manager:
- Entity Id, sometimes referred as Issuer URL or SAML Metadata URL.
- Single Sign On URL, sometimes referred as SAML 2.0 Endpoint or SAML Protocol URL.
- Single Logout Service URL: this is optional as some Identity Providers don't support it. Even if they support it, leave it blank if you don't want to log out of the Identity Provider when you log out of Team Password Manager.
- Certificate: the Identity Provider will supply a x509 certificate. It's a bunch of letters and numbers that begin with
-----BEGIN CERTIFICATE-----and end with-----END CERTIFICATE-----. You need to enter all of it in this field (better use copy and paste).
- Copy Team Password Manager SAML details to the Identity Provider: in Team Password Manager, go to Settings | SAML Authentication and take note of the following Service Provider Settings, which you'll have to copy to your Identity Provider:
- Identity Id
- Assertion Consumer Service URL
- Single Logout Service URL: optional, only if the Identity Provider supports single logout and/or if you want to use it.
- In the Identity Provider, grant access to the user to the newly created app.
That's basically it. The next steps are configuring the sign in screen (if you want) and creating SAML users.
Configuring the Sign In screen
When SAML Authentication is enabled and configured, and there are active SAML users, the Sign In screen will show a link in the bottom right corner called "Sign In via SAML". Clicking this link will start the SAML authentication process as shown in the introduction.
You can change the name of the link to one of your choice. To do so, click in "Edit other SAML Settings" in Settings | SAML Authentication and enter the name you want in the "SAML Sign in Text" field.
If the majority of your users are SAML users you may want to display a different sign In screen. We've developed one that only has a button and that doesn't have the classic username/password fields:
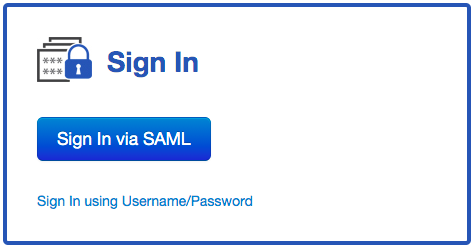
To use this screen by default, click in "Edit other SAML Settings" in Settings | SAML Authentication and select "SAML Sign In Screen" in the "Default Sign In Screen" option. Note that:
- The text on the button will be the same one you enter in the "SAML Sign in Text" field, which defaults to "Sign In via SAML".
- If SAML authentication is disabled or there are no active SAML users, this selection takes no effect and the classic username/password sign in screen will be shown by default.
- Non-SAML users can still log in by clicking on the "Sign In using Username/Password" link. This link will open the classic username/password sign in screen.
SAML users
SAML users are users in Team Password Manager that can authenticate using SAML. SAML users are like regular users but don't have a password, and their most important property is their email address, because it's the datum that identifies the user in the SAML Identity Provider.
You can create SAML users in Team Password Manager in two ways: manually or using LDAP.
Creating SAML users manually
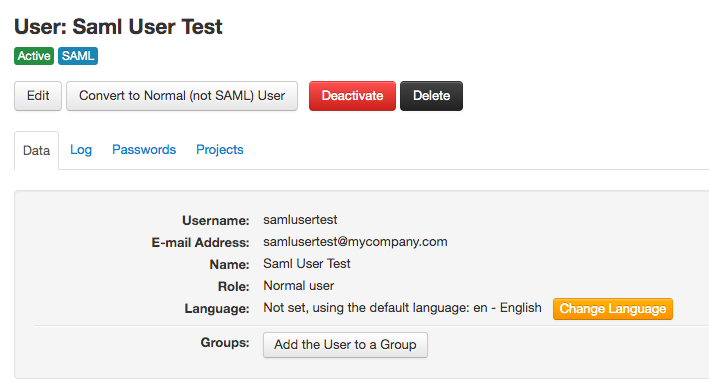
To manually create a SAML user go to "Users/Groups" in the top menu and then click on "New SAML User" using the button dropdown. Here's how a SAML user looks once is created, you'll notice the SAML label:
If you already have a normal user and want to convert it to a SAML user you can do it with the "Convert to SAML User" button in the user's screen:

Provisioning SAML users via LDAP
LDAP users can be automatically converted to SAML users just changing a setting. In this case, they won't be able to authenticate using LDAP, only via SAML. You can still import or sync them using LDAP, but authentication will only be possible using SAML. This conversion is per LDAP server, so all the users of an LDAP server are either regular LDAP users or SAML users.
To convert LDAP users to SAML users automatically we've added a new setting in the LDAP servers configuration: "Authentication":

This field allows you to set how users for the LDAP server authenticate:
- Using LDAP: this is the default. Users are provisioned using LDAP import or LDAP sync and authenticate using LDAP.
- Using SAML: in this case users are provisioned using LDAP import or LDAP sync and authenticate using SAML.
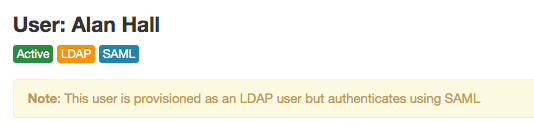
Users provisioned this way have both the LDAP and the SAML labels:
Properties of SAML users
Although SAML users are like regular users regarding the functionality of Team Password Manager, they have some special properties:
- SAML users cannot be “API only” users.
- SAML users can only access the API using HMAC authentication (since v. 10.138.240).
- SAML users can be converted to normal users and vice versa.
- SAML users cannot use two-factor authentication in Team Password Manager. In this case, two-factor authentication should be provided by the Identity Provider.
- SAML users cannot be used to upgrade Team Password Manager.
It's worth noting the last point: since a SAML user cannot be used to upgrade Team Password Manager, you should have at least one Admin/IT regular user.
SAML Settings Reference
You can access the SAML settings in the "Settings" option in the top menu and then "SAML Authentication" in the sidebar. They are divided in 3 sections: Service Provider Settings, Identity Provider Settings and Other Settings. It's important to note that all the settings are stored encrypted in the database.
Service Provider (Team Password Manager) Settings
- Entity Id, Assertion Consumer Service URL and Single Logout Service URL. These URLs are fixed and cannot be changed. You'll need to enter them in your Identity Provider.
- Certificate and Private Key: normally the Identity Provider is the one creating the certificate needed for the SAML exchange. If you need to use a SP certificate, you enter it in these two fields.
- Name ID Format: you normally won't need to change it. It defaults to
urn:oasis:names:tc:SAML:1.1:nameid-format:emailAddress.
Identity Provider Settings
These settings are provided by your Identity Provider and you need to enter them here. Except for the "Single Logout Service URL", all the others are required for SAML to work.
- Identity Id. Other names that Identity Providers give to this setting: Issuer URL, SAML Metadata URL.
- Single Sign On URL. Other names that Identity Providers give to this setting: SAML 2.0 Endpoint, SAML Protocol URL.
- Single Logout Service URL: if your Identity Provider supports SP initiated logout you need to enter the SLS URL here. You can also leave this field empty if you don't want to use SAML single logout or if your Identity Provider doesn't support it.
- Certificate: in this field you enter the x509 certificate given by your Identity Provider. It's a bunch of letters and numbers that begin with
-----BEGIN CERTIFICATE-----and end with-----END CERTIFICATE-----. You need to enter all of it in this field.
Other Settings
These settings are optional, but may be useful to you:
- Custom Settings: in this field you can enter more than one lines of settings in this format:
custom.setting=value. They're passed directly to our SAML Library and control various aspects of the SAML operation. Use them only when required by our support department. - SAML Sign in Text: this is the text shown in the Sign In screen of Team Password Manager to sign in using SAML. If you're using the SAML specific sign in screen ("SAML Sign in Screen"), it's the text of the Sign In button. It defaults to "Sign In via SAML".
- Default Sign In Screen: it's the screen presented to the users to sign in to Team Password Manager. It can be:
- Normal Username/Password Sign In Screen: this is the classic username/password screen. If SAML is enabled and configured, and there are active SAML users, a "Sign In via SAML" link appears on the bottom right corner of the screen. Clicking this link initiates the SAML Single Sign-on process.
- SAML Sign In Screen: when this screen is selected, users are presented with a screen with a button with the text "Sign In via SAML". Clicking this button initiates the SAML Single Sign-on process. Non-SAML users can also sign in using the classic username/password system clicking the "Sign In using Username/Password" link also present in this screen.
- Internal notes: in this field you can enter notes for your reference. Example: links/instructions on how to setup SAML by your Identity Provider.
Document changelog
| Feb 19, 2026: | Notice about having the server time synchronized. |
| May 24, 2022: | SAML users can only access the API using HMAC authentication (since v. 10.138.240) |
| May 3, 2021: | Document created |