Full installation of Team Password Manager on Ubuntu 18.04 with Apache
Current Team Password Manager version: 14.190.309This tutorial explains how to install Team Password Manager on a Linux Ubuntu 18.04 (LTS) system, including the installation of the required components (Apache 2.4, MySQL 5.7, PHP 7.3, Ioncube Loader) and a commercial SSL certificate.
A similar version of this tutorial with more up to date versions of the components can be found here: Install on Ubuntu with Apache.
To be able to follow this tutorial you'll need: a running Ubuntu 18.04 system (preferably with nothing else installed), which can be accessed from anywhere on the Internet, root access to this system and a non-root user which we'll use to do everything with sudo for security. You'll also need some basic Linux knowledge.
- Basic settings
- Apache installation
- MySQL installation
- PHP installation
- Configuring the web server using Virtual hosts
- HTTPS and installing a commercial SSL Certificate
- Ioncube loader installation
- Team Password Manager database and user
- Team Password Manager files
- Team Password Manager configuration file
- Team Password Manager installation script
Basic settings
We'll be creating a Team Password Manager installation that will be accessed using this URL: https://tpm.mycompany.com. We'll be referring to this URL throughout this document, so adjust it to your own URL each time.
In this section we're going to prepare the system with some basic settings:
• Make sure the system is updated with the following commands:
$ sudo apt-get update && sudo apt-get upgrade
• Update the hosts file (/etc/hosts) with the hostname and the Team Password Manager URL. To do it:
1. Get the hostname of your computer with this command: $ hostname
2. Edit /etc/hosts and enter the following line:
IP ADDRESS hostname tpm.mycompany.com
If, for instance, the IP address ofyour server is 1.2.3.4 and your hostname is tpm-hostname, this line should be:
1.2.3.4 tpm-hostname tpm.mycompany.com
• Set the timezone of your server. To do it, execute the following command and select the timezone you want:
$ sudo dpkg-reconfigure tzdata
We've chosen London, in which case the outcome is:
Current default time zone: 'Europe/London'
Local time is now:      Fri Mar 27 09:27:52 GMT 2020.
Universal Time is now:  Fri Mar 27 09:27:52 UTC 2020.
You can also check the date using this command: $ date
• Enable the firewall (ufw), also enabling SSH through it. Execute these two commands to do it:
$ sudo ufw allow ssh
$ sudo ufw enable
• Install fail2ban. fail2ban is an application that bans IP addresses that try nasty things on our server (like forcing login attempts), so it's a good application to have. To install and configure it using its basic settings execute the following commands:
$ sudo apt install fail2ban
$ sudo cp /etc/fail2ban/fail2ban.conf /etc/fail2ban/fail2ban.local
• Turn on network time protocol (ntp) so that the server time is synced over the Internet. This is a must if you plan to use 2 factor authentication in Team Password Manager. Execute the following commands to enable ntp:
$ sudo timedatectl set-ntp off
$ sudo timedatectl set-ntp on
$ sudo ufw allow ntp
Apache 2.4 installation
We'll be using Apache 2.4 as our web server. To install it use the following command:
$ sudo apt install apache2
Once it's installed let's configure a couple of things:
• Set the ServerName in Apache. To do it execute this command, replacing "HOSTNAME" with the hostname of your server, which you can get with the $ hostname command:
echo "ServerName HOSTNAME" | sudo tee /etc/apache2/conf-available/fqdn.conf && sudo a2enconf fqdn
Then reload Apache with this command:
$ sudo systemctl reload apache2
• Enable http and https ports (80, 443) through the firewall:
$ sudo ufw allow in "Apache Full"
• Enable Apache MPM prefork (instead of event). Execute the following commands:
$ sudo a2dismod mpm_event
$ sudo a2enmod mpm_prefork
And finally restart Apache with this command:
$ sudo systemctl restart apache2
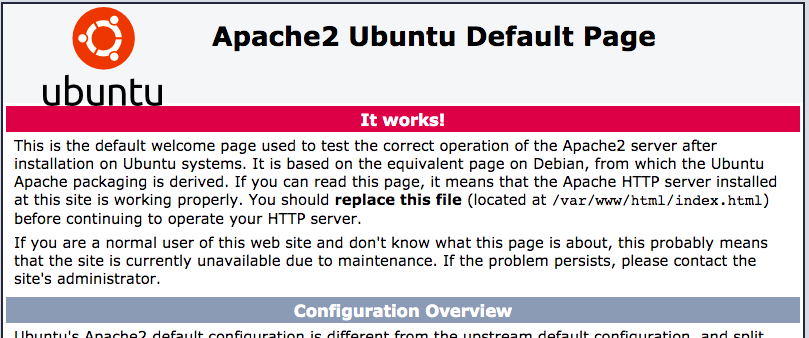
To test that Apache is running in your server you can open a web browser and type the IP address of your server in the address bar. If everything is ok you should see the following Apache default page:
MySQL 5.7 installation
We're going to use MySQL 5.7 as the database for Team Password Manager. To install it use the following command:
sudo apt install mysql-server-5.7
Once it's installed, run the security script to set the root password and some additional settings:
$ sudo mysql_secure_installation
You can safely set the following options in the script:
- Medium level of the password validation policy (Length >= 8, numeric, mixed case, and special characters).
- Remove anonymous users.
- Disallow root login remotely.
- Remove test database and access to it.
Once the script is finished you can test the connection using the following command:
$ sudo mysql -uroot -p (and then enter the mysql root password you've just set using the script)
You'll be placed at the mysql prompt: mysql>. Just type exit to return to the system prompt.
PHP 7.3 installation
If you do the default PHP installation on Ubuntu 18.04 you'll install PHP 7.4. So, we're going to use another reposity (ondrej) to be able to select PHP 7.3. (Note: Team Password Manager is currently compatible with PHP 7.4, but we created this document when it wasn't, that's it uses PHP 7.3).
Use the following commands to add ondrej's PHP repository to your system:
$ sudo add-apt-repository -y ppa:ondrej/php
$ sudo apt-get update
Then install PHP 7.3 and the required modules for Team Password Manager:
$ sudo apt install php7.3 php7.3-cli php7.3-mysql php7.3-mbstring php7.3-ldap php7.3-curl php7.3-gd php7.3-xml
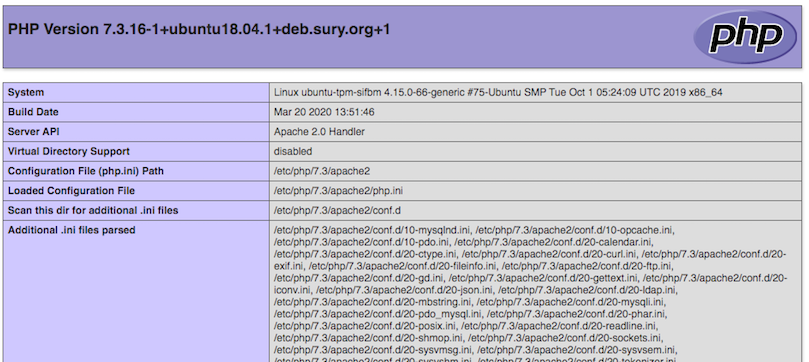
Check that you've installed the correct PHP version using this command: $ php -v. You should see an output similar to this one:
PHP 7.3.16-1+ubuntu18.04.1+deb.sury.org+1 (cli) (built: Mar 20 2020 13:51:46) ( NTS )
Copyright (c) 1997-2018 The PHP Group
Zend Engine v3.3.16, Copyright (c) 1998-2018 Zend Technologies
    with Zend OPcache v7.3.16-1+ubuntu18.04.1+deb.sury.org+1, Copyright (c) 1999-2018, by Zend Technologies
Set PHP's timezone to match the one of your server's: edit /etc/php/7.3/apache2/php.ini and set the following entry with the same timezone you set in the Basic settings section (all the PHP timezones can be found here: https://www.php.net/manual/en/timezones.php). In our case we set it to "Europe/London":
date.timezone = "Europe/London"
After this, restart Apache:
$ sudo systemctl restart apache2
To check that PHP is correctly installed and communicating with Apache, do this:
1. Create a file called phpinfo.php in /var/www/html/ with the following content:
<?php phpinfo();
2. Open this file with the browser pointing at your IP address: http://IP_ADDRESS/phpinfo.php
You should see the phpinfo page with all the PHP settings. You can send this to PDF to keep it for your records. Afterwards, delete the phpinfo.php file.
Configuring the web server to run our Team Password Manager installation using Virtual hosts
As stated earlier, we're going to access the Team Password Manager installation using this URL: https://tpm.mycompany.com. To make this possible, you need to do two things:
1. Create a new A/AAAA record in your DNS manager so that tpm.mycompany.com resolves to the server's IP address.
2. Configure a virtual host in Apache to accept tpm.mycompany.com (for port 80 (http) and 443 (https)) and make it execute the Team Password Manager installation.
Let's explain them in more detail:
1. Go to the DNS manager for your domain and create an A record (AAAA if IPv6) for your tpm.mycompany.com subdomain, specifying the IP address of your server and the default TTL value if you need to set one. To test open the browser and enter tpm.mycompany.com in the address bar. You should see the Apache default page. Note that this can take a while to propagate through all the DNS servers so it's normal if you don't see this immediately. Just wait for a few minutes.
2. Virtual hosts: virtual hosts allow your Apache server to serve more than one site and configure each site with their own set of options. In this case, "site" is the Team Password Manager installation. We'll configure one virtual host to serve tpm.mycompany.com. First we'll do the configuration for http://tpm.mycompany.com and later we'll configure https://tpm.mycompany.com with a commercial SSL certificate. Please follow these steps (remember always to change tpm.mycompany.com to your own subdomain):
2.1 Create a copy of the default Apache configuration file for the Team Password Manager site:
$ sudo cp /etc/apache2/sites-available/000-default.conf /etc/apache2/sites-available/tpm.mycompany.com.conf
2.2 Edit the tpm.mycompany.com.conf configuration file to look like this:
<Directory /var/www/html/tpm.mycompany.com/public_html>
	Require all granted
	AllowOverride All
	Options FollowSymLinks
</Directory>
<VirtualHost *:80>
	ServerName tpm.mycompany.com
	ServerAlias tpm.mycompany.com

	ServerAdmin info@mycompany.com

	DocumentRoot /var/www/html/tpm.mycompany.com/public_html

	ErrorLog /var/www/html/tpm.mycompany.com/logs/error.log
	CustomLog /var/www/html/tpm.mycompany.com/logs/access.log combined
</VirtualHost>
Some explanations:
/var/www/html/tpm.mycompany.com/public_htmlis where we'll put the Team Password Manager software files. We'll do this later on this tutorial. TheDocumentRootdirective is used to tell the web server that when a request is made to tpm.mycompany.com it should serve the files on /var/www/html/tpm.mycompany.com/public_html.- The
ErrorLogandCustomLogdirectives create specific logs for our installation, which are stored in/var/www/html/tpm.mycompany.com/logs/. Note that these logs are web server logs, not the internal log of Team Password Manager (which can be found in the top menu of the software, "Log" option). - We've also set the following options in the site folder:
Require all granted: all IP addresses can access the site,AllowOverride All: allows .htaccess files in folders to override the Apache configuration andOptions FollowSymLinksdisables directory listing for security.
2.3 Create the installation folders:
$ sudo mkdir -p /var/www/html/tpm.mycompany.com/{public_html,logs}
public_html is currently owned by root, but it's better if you assign ownership to the user you're using to setup all of this or the one who's going to maintain it ($USER, which is the current user, or the username you want):
$ sudo chown -R $USER:$USER /var/www/html/tpm.mycompany.com/public_html
Set appropriate permissions for public_html:
$ sudo chmod -R 755 /var/www/html/tpm.mycompany.com/public_html
The final result should be similar to this:
myuser@myhostname:/var/www/html/tpm.mycompany.com$ ls -la
total 16
drwxr-xr-x 4 root   root   4096 Mar 28 18:28 .
drwxr-xr-x 3 root   root   4096 Mar 28 18:28 ..
drwxr-xr-x 2 root   root   4096 Mar 28 18:28 logs
drwxr-xr-x 2 myuser myuser 4096 Mar 28 18:28 public_html
2.4 Enable the site:
$ sudo a2ensite tpm.mycompany.com
Disable the default virtual host to minimize security risks:
$ sudo a2dissite 000-default.conf
And finally reload Apache:
$ sudo systemctl reload apache2
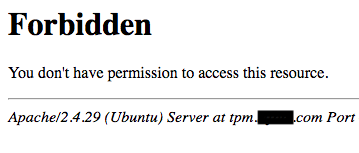
To test, enter http://tpm.mycompany.com/ in your browser and you should see this forbidden message as we haven't yet put any files in the public_html folder (and also due to Options FollowSymLinks):
Also, after accessing it, check the logs folder and you'll see the two log files: access.log and error.log (this one should empty).
HTTPS and installing an SSL Certificate from a Commercial Certificate Authority
Up to this point we've configured the server to accept requests to http://tpm.mycompany.com.
In this section we'll:
- Install a commercial SSL certificate to avoid browser warnings about unsafe connections.
- Configure the web server to accept requests to https://tpm.mycompany.com (note the "s" in https), so that the communication between the client's browser and the server is encrypted.
Let's get to it. We'll first begin by changing to root user and updating the system:
$ su - root (and enter the root password)
# apt-get update && apt-get upgrade
To get a commercial SSL certificate we'll need a private key and a Certificate Signing Request (CSR) file. You can create them using the following commands:
Create a folder where to store the certificate files and go to that folder:
# mkdir /root/certs/ && cd /root/certs/
Execute openssl to create the private key and CSR (remember to use your own subdomain instead of tpm.mycompany.com):
# openssl req -newkey rsa:2048 -nodes -keyout tpm.mycompany.com.key -out tpm.mycompany.com.csr
When you execute this you'll be required to enter some information that will be integrated into your certificate request. It's specially important that you correctly enter the "Common name", which is the URL you want to use to access your installation of Team Password Manager. In this case we've used tpm.mycompany.com because we'll use https://tpm.mycompany.com to access our Team Password Manager installation (marked in red):
Generating a RSA private key
.....................+++++
......+++++
writing new private key to 'tpm.mycompany.com.key'
-----
You are about to be asked to enter information that will be incorporated
into your certificate request.
What you are about to enter is what is called a Distinguished Name or a DN.
There are quite a few fields but you can leave some blank
For some fields there will be a default value,
If you enter '.', the field will be left blank.
-----
Country Name (2 letter code) [AU]:ES
State or Province Name (full name) [Some-State]:Barcelona
Locality Name (eg, city) []:My city
Organization Name (eg, company) [Internet Widgits Pty Ltd]:My company
Organizational Unit Name (eg, section) []:Security
Common Name (e.g. server FQDN or YOUR name) []:tpm.mycompany.com
Email Address []:info@mycompany.com

Please enter the following 'extra' attributes
to be sent with your certificate request
A challenge password []:
An optional company name []:
The outcome of executing openssl are two files: tpm.mycompany.com.key and tpm.mycompany.com.csr.
tpm.mycompany.com.key is the private key, and you should protect it and not disclose it to anyone. tpm.mycompany.com.csr is the CSR file. You'll be required to copy and paste its contents into the online enrollment form when requesting the certificate.
You should now purchase the certificate from a Commercial Authority (CA). We've used Namecheap (PositiveSSL certificate) but you can use any CA that you like. The CA will ask you to copy the information in the CSR file (everything from -----BEGIN CERTIFICATE REQUEST to END CERTIFICATE REQUEST-----) and paste it on the indicated form. You can see the contents of the CSR file with this command: # cat tpm.mycompany.com.csr. You'll also need to validate your domain, the CA will provide various methods for doing so.
The CA will provide you with two files: tpm_mycompany_com.crt and tpm_mycompany_com.ca-bundle. Once you have them continue with the following steps:
Copy the files to the appropriate folders:
# cp tpm_mycompany_com.crt /etc/ssl/certs/
# cp tpm_mycompany_com.ca-bundle /etc/ssl/certs/

# cp tpm.mycompany.com.key /etc/ssl/private/
# cp tpm.mycompany.com.csr /etc/ssl/private/
Delete them from the /root/cert folder:
# rm /root/cert/tpm*
Note: we advise you to store all the certificate files outside the server, in a backup location.
The certificate files should be owned by root and protected by a permission setting of 600:
# chown -R root. /etc/ssl/private/tpm*
# chown -R root. /etc/ssl/certs/tpm*

# chmod -R 0600 /etc/ssl/private/tpm*
# chmod -R 0600 /etc/ssl/certs/tpm*
So the result of installing the certificate files should be something like this:
# ls -la /etc/ssl/certs/tpm*
-rw------- 1 root root 4123 Mar 29 11:47 /etc/ssl/certs/tpm_mycompany_com.ca-bundle
-rw------- 1 root root 2049 Mar 29 11:47 /etc/ssl/certs/tpm_mycompany_com.crt

# ls -la /etc/ssl/private/tpm*
-rw------- 1 root root 1102 Mar 29 11:48 /etc/ssl/private/tpm.mycompany.com.csr
-rw------- 1 root root 1704 Mar 29 11:47 /etc/ssl/private/tpm.mycompany.com.key
Let's now tackle the Apache configuration part.
Activate the ssl and headers modules:
# a2enmod ssl
# a2enmod headers
Restart Apache:
# systemctl restart apache2
We'll now edit the virtual host configuration file we created in the previous section (/etc/apache2/sites-available/tpm.mycompany.com.conf) to a) redirect http to https and 2) configure https. So edit this file to make it look like this, as always replacing tpm.mycompany.com with your own subdomain (we've marked the new lines in blue):
<Directory /var/www/html/tpm.mycompany.com/public_html>
	Require all granted
	AllowOverride All
	Options FollowSymLinks
</Directory>
<VirtualHost *:80>
	ServerName tpm.mycompany.com
	ServerAlias tpm.mycompany.com
	ServerAdmin info@mycompany.com
	DocumentRoot /var/www/html/tpm.mycompany.com/public_html

	ErrorLog /var/www/html/tpm.mycompany.com/logs/error.log
	CustomLog /var/www/html/tpm.mycompany.com/logs/access.log combined
	Redirect 301 / https://tpm.mycompany.com/
</VirtualHost>
<VirtualHost *:443>
    ServerAdmin info@mycompany.com
    ServerName tpm.mycompany.com
    ServerAlias tpm.mycompany.com

    DocumentRoot /var/www/html/tpm.mycompany.com/public_html
    ErrorLog /var/www/html/tpm.mycompany.com/logs/error.log
    CustomLog /var/www/html/tpm.mycompany.com/logs/access.log combined

    SSLEngine on

    SSLCertificateFile /etc/ssl/certs/tpm_mycompany_com.crt
    SSLCertificateKeyFile /etc/ssl/private/tpm.mycompany.com.key
    SSLCertificateChainFile /etc/ssl/certs/tpm_mycompany_com.ca-bundle

    # HSTS (mod_headers is required) (15768000 seconds = 6 months)
    Header always set Strict-Transport-Security "max-age=15768000"
</VirtualHost>
Let me explain some of the changes we've introduced:
- The
<VirtualHost *:80>section now has a new directive,Redirect, which we use to redirect the non encrypted requests (http) to the encrypted ones (https). So, even if a user goes to http://tpm.mycompany.com, she'll be automatically redirected to https://tpm.mycompany.com. - We've created a new section (
<VirtualHost *:443>) to configure https, to respond to requests made to https://tpm.mycompany.com. The information is the same of the non-ssl section but with the SSL directives.
Finally, reload Apache for the changes to take effect:
# systemctl reload apache2
You should also exit to get out of root return to the normal user.
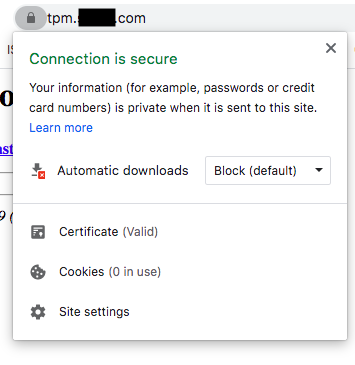
You can now test the requests: if you go to http://tpm.mycompany.com, you should be redirected to https://tpm.mycompany.com, and see the same forbidden message as before (as we still haven't installed the software files). This time, though, you can see that the browser shows you the secure connection "lock" icon and if you click on it you'll find information about the certificate:
Ioncube loader installation
Team Password Manager is a PHP web application encoded and secured using Ioncube and a loader is required to execute it. To install the Ioncube loader follow these steps:
Go to https://www.ioncube.com/loaders.php and download the Linux (64 bits) zip package (under "Production loaders"). You should get the following file: ioncube_loaders_lin_x86-64.zip.
Unzip it (it will create the "ioncube" folder) and copy (or upload) the ioncube_loader_lin_7.3.so file into the following folder on your server: /usr/lib/php/20180731.
Edit the php.ini file in /etc/php/7.3/apache2/php.ini and put this line just below [PHP]:
zend_extension = /usr/lib/php/20180731/ioncube_loader_lin_7.3.so
Restart Apache:
$ sudo systemctl restart apache2
To test: create a file called phpinfo.php in /var/www/html/tpm.mycompany.com/public_html with this content:
<?php phpinfo();
Open this file with the browser: https://tpm.mycompany.com/phpinfo.php
Check the "Zend engine" box for the Ioncube message, like in this image (your Ioncube loader version may be different, here we installed 10.3.9):

Delete the phpinfo.php file.
Team Password Manager database and user
In this section we're going to create the database that will store the Team Password Manager information and a user to access this database from the software. We're going to use these values, we advise you use your own:
Database: tpm_database
User: tpm_user
Password: tpmPass%2020
Follow these steps to create the database and user:
1. Enter the mysql prompt with the mysql root user:
$ sudo mysql -uroot -p (and enter the mysql root password)
2. Type the following command at the mysql prompt to create the database:
mysql> CREATE DATABASE `tpm_database` CHARACTER SET utf8 COLLATE utf8_unicode_ci;
3. Type the following command at the mysql prompt to create the user:
mysql> CREATE USER 'tpm_user'@'localhost' IDENTIFIED BY 'tpmPass%2020';
3. Type the following commands at the mysql prompt to grant all the privileges to the user on the database:
mysql> GRANT ALL PRIVILEGES ON `tpm_database`.* TO 'tpm_user'@'localhost';
mysql> FLUSH PRIVILEGES;
Type exit at the mysql prompt to exit mysql and return to the normal linux prompt.
Team Password Manager files
Download the Team Password Manager software files from https://teampasswordmanager.com/download/, unzip the zip file and upload all the files and folders to /var/www/html/tpm.mycompany.com/public_html. You should have something like this when done (myuser is the user you're using to create the installation; also note that at the time of writing this tutorial the version of Team Password Manager used is 7.109.212, so you might have different file sizes):
$ ls -la
total 716
drwxr-xr-x  7 myuser myuser   4096 Mar 30 11:23 .
drwxr-xr-x  4 root   root     4096 Mar 28 18:28 ..
-rw-r--r--  1 myuser myuser   1873 Mar 30 11:23 config.php
drwxrwxr-x  3 myuser myuser   4096 Mar 30 11:23 css
-rw-r--r--  1 myuser myuser   8961 Mar 30 11:23 eula.txt
-rw-r--r--  1 myuser myuser    610 Mar 30 11:23 folder.php
drwxrwxr-x  2 myuser myuser   4096 Mar 30 11:23 import
-rw-r--r--  1 myuser myuser 656117 Mar 30 11:23 index.php
-rw-r--r--  1 myuser myuser  10724 Mar 30 11:23 install.txt
-rw-r--r--  1 myuser myuser     25 Mar 30 11:23 robots.txt
drwxrwxr-x  8 myuser myuser   4096 Mar 30 11:23 system
-rw-r--r--  1 myuser myuser   4333 Mar 30 11:23 upgrade.txt
drwxrwxr-x  2 myuser myuser   4096 Mar 30 11:23 uploads
drwxrwxr-x 17 myuser myuser   4096 Mar 30 11:23 wmm
The uploads and import folder should be writable by the web server. One way to do it is to change their group to www-data, which is the one used by Apache:
$ sudo chown myuser:www-data uploads
$ sudo chown myuser:www-data import
Team Password Manager configuration file (config.php)
Edit the config.php file and enter the database, user and password configured in the database step:
// MySQL Database server
define('CONFIG_HOSTNAME', 'localhost');

// User that accesses the database server, that should have all privileges on the database CONFIG_DATABASE
define('CONFIG_USERNAME', 'tpm_user');

// User password
define('CONFIG_PASSWORD', 'tpmPass%2020');

// Database for Team Password Manager. You must manually create it before installing Team Password Manager
define('CONFIG_DATABASE', 'tpm_database');
Team Password Manager installation script
Open your browser and enter this in the address bar:
https://tpm.mycompany.com/index.php/install
You should see the Team Password Manager installation screen:
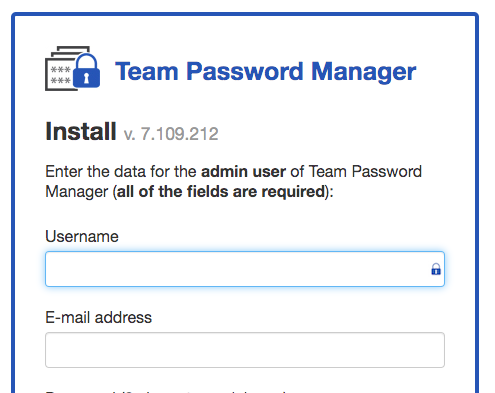
Just enter the values and complete the installation.
If everything went well Team Password Manager is now installed. Congratulations!!
Document changelog
| May 10, 2021: | PHP 7.4 compatibility note and PHP XML installation for SAML compatibility (php7.3-xml) |
| Mar 31, 2020: | Document created |