Beginning in version 2.11.24, Team Password Manager allows users to authenticate against a Lightweight Directory Access Protocol (LDAP) directory or an Active Directory (AD) (Windows). This is useful for organizations that have an existing directory with usernames and passwords, and want Team Password Manager users to be able to authenticate against it.
This document explains everything you need to know about LDAP authentication in Team Password Manager. Here are the main sections:
- Introduction: how LDAP authentication works in Team Password Manager
- Settings: enabling/disabling and setting up the server connection
- Creating an LDAP user manually
- Importing LDAP users
- Converting existing normal users to LDAP users and viceversa
- Logging LDAP authentication actions
Introduction: how LDAP authentication works in Team Password Manager
In a nutshell, LDAP authentication in Team Password Manager works like this:
- A user of type LDAP is created by an admin user. This user has the same properties of normal user but instead of a password, she has a DN (Distinguished Name), which uniquely identifies her in the LDAP server.
- When a user signs in into Team Password Manager, two things happen:
- The user's username is checked against the Team Password Manager database.
- If the previous step is ok, a connection is established with the LDAP server using the user's credentials (DN and password) to authenticate the user against the LDAP server.
The first thing you might have noticed, specially if you've worked with other systems that use LDAP authentication, is that the user still has to be created in Team Password Manager. The reasons we do it like this are:
- Security (1): Team Password Manager stores critical data. Any user that has access to it should be previously registered by an admin user to prevent unauthorized access.
- Security (2): since the user has her DN stored and enters her LDAP password at sign in time, no LDAP passwords have to be stored in Team Password Manager.
- Flexibility: Team Password Manager allows you to have LDAP and "normal" users. Also, you can turn an LDAP user to a "normal" one and viceversa.
- User homogeneity: an LDAP user in Team Password Manager has the same properties of a "normal" user. The fact that she authenticates against an LDAP server doesn't mean she has to be restricted in some way.
- Different base DNs: each LDAP user has her own DN, which might come from different branches of the LDAP tree.
Team Password Manager includes an import mechanism to automatically import and create LDAP users so that you don't have to manually create them.
Another important thing to note is that Team Password Manager will never modify any data inside your LDAP server. The only operations that Team Password Manager executes with your LDAP server are: bind/unbind and search.
Setting up LDAP authentication in Team Password Manager involves: 1) setting up the server connection and testing it, and 2) creating LDAP users or converting existing users to LDAP. Read on to learn how to do this.
Settings: enabling/disabling and setting up the server connection
Enabling LDAP authentication and entering the server connection data
By default, LDAP authentication is disabled in Team Password Manager. To enable it go to the "Settings" option in the top menu, then click on the "LDAP auth." tab and finally on the "Enable LDAP authentication" button. When you enable LDAP authentication you have to enter the server connection settings:
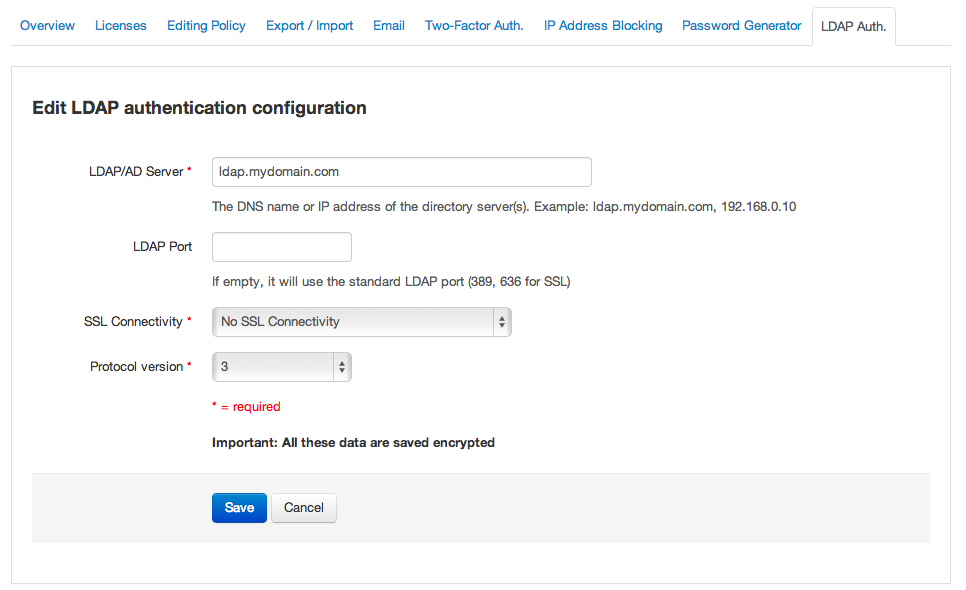
The LDAP server connection settings are the usual for accessing an LDAP server:
- Server DNS name or IP address. Example: directory.mycompany.com.
- LDAP port. The port that your server uses. If you don't enter any value, the default ports for LDAP will be used: 389 for non-SSL and TLS connections and 636 for SSL.
- Type of encryption. 3 values are possible here: "No SSL Connectivity", "Use SSL" (will prepend "ldaps://" to the server address and use port 636), and "Use TLS".
- LDAP protocol version. you can use version 3 (default), or version 2.
Testing the server connection
To test the server connection you can use the "Test LDAP/AD server connectivity" button, that will show the following screen:
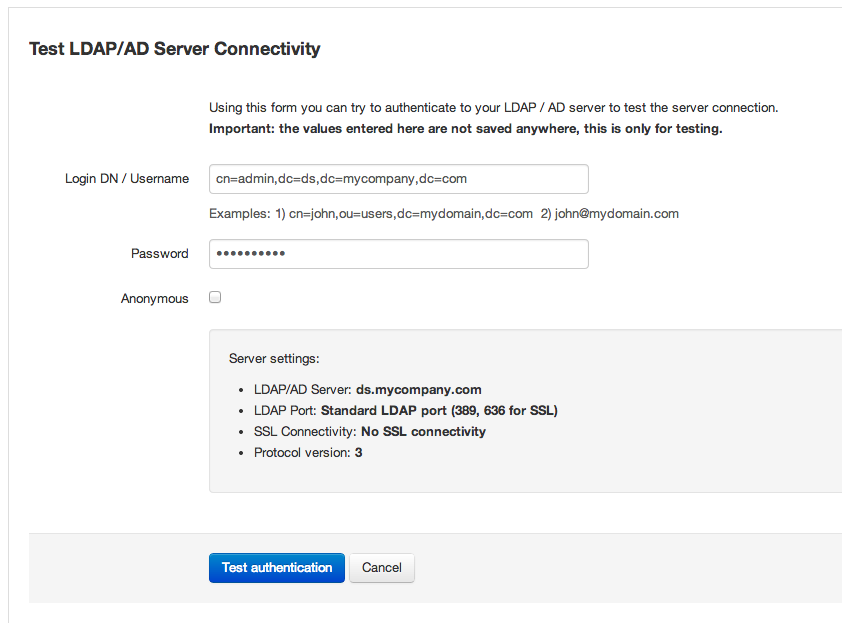
At this screen you can enter the login DN or username and password for a user that has access to the LDAP server, or you can click on the "Anonymous" checkbox if your server supports it. By clicking on "Test authentication", Team Password Manager will try to authenticate with your LDAP server to see if the connection works.
The data you enter in this test screen is never saved anywhere, it's only sent to the LDAP server.
Disabling LDAP authentication
You can disable LDAP authentication by clicking on "Disable LDAP authentication" and confirming the action. Disabling LDAP authentication has the following effects:
- Any LDAP users will not be able to sign in into Team Password Manager. If you want them to be able to do so, you'll have to convert them to "normal" users. LDAP users that are logged in will NOT be kicked out.
- You won't be able to create or import LDAP users.
Creating an LDAP user manually
After successfully testing the LDAP server connection you can proceed to create LDAP users. You can do this in two ways: manually or automatically (importing them). This section explains how to create an LDAP user manually. We suggest you learn how to do it even if you're planning to create the users by importing them from the LDAP server.
To create an LDAP user manually do the following:
- Click on the "Users / Groups" option in the top menu.
- Click on the "New Users Option" button and then on the "New LDAP User" button. You'll see the same screen as the "New User" screen except that this one has the "Login DN" field instead of the "Password / Repeat password" fields:
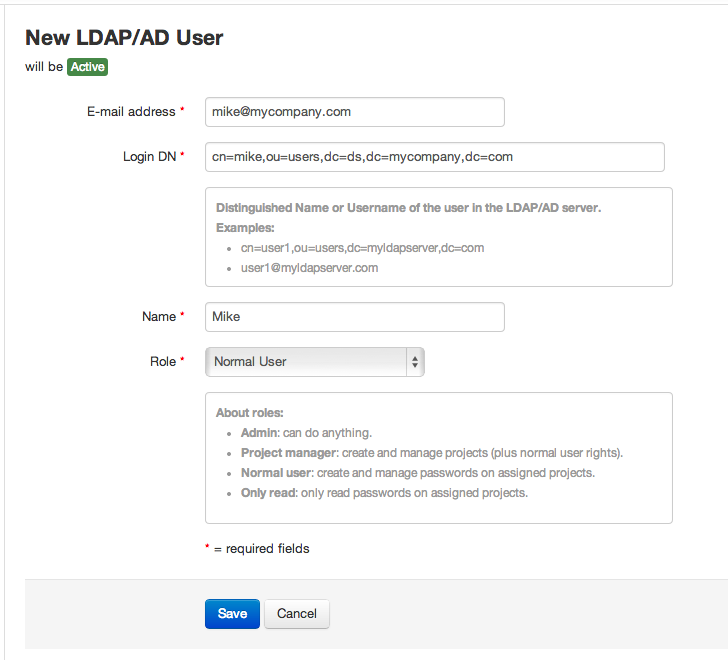
- Enter the required fields and save. The "Login DN" field is the Distinguished Name of the user in the LDAP server. You'll find it by looking it up using your LDAP client. For Active Directory it can also be the username, for example: mike@mycompany.com.
Note that the "Login DN" won't be validated. You can enter anything you like here, but if it's not the correct DN or Username, the user won't be able to sign in into Team Password Manager (because the bind operation with the LDAP server will fail).
Also, the e-mail address entered here need not match the e-mail address of the user in the LDAP server (if the user has any). This e-mail address is only required for Team Password Manager. The "Login DN" field is the only "link" to the LDAP server for the user. Note that the "Login DN" field is stored encrypted in the user's record in the database.
To test if you created the user correctly, have her sign in into Team Password Manager using her e-mail and her password from the LDAP server.
As stated before, this newly created user has all the features of any other user in Team Password Manager. She can use two-factor authentication. She can be part of any group. She can be given access to any project. And so on.
LDAP users are marked with an orange label at any screen, like this:

Importing LDAP users
Creating many LDAP users manually can be tiresome and prone to errors. This is why Team Password Manager includes a function to import the existing users in your LDAP server.
Importing users from your LDAP server will automatically create the user using the following data from the LDAP server: an e-mail, a name and a DN string. Of these, only the e-mail and DN are required.
The import LDAP users feature is a two-step process that involves: 1) entering the required data to search for the users in your LDAP server, and 2) selecting the users you want to import.
To import users from your LDAP server, do the following:
- Click on the "Users / Groups" option in the top menu.
- Click on the "New Users Option" button and then on the "Import LDAP Users" button. This will display the step 1 screen:
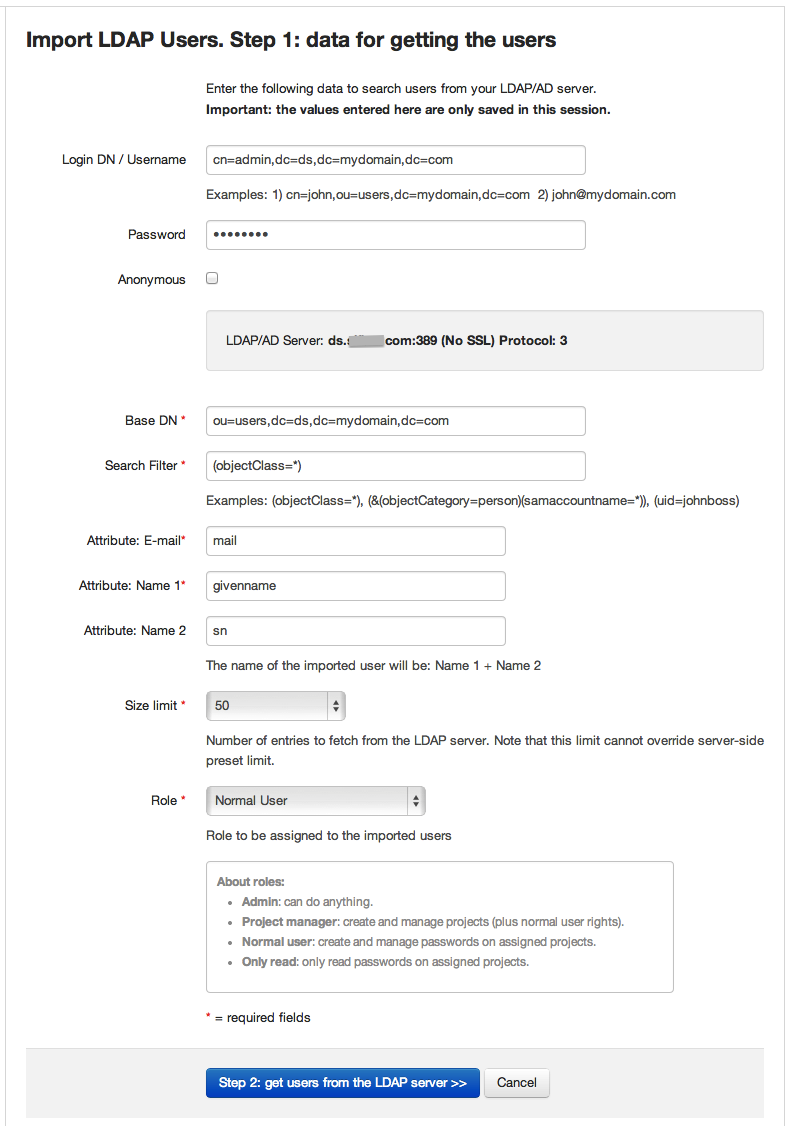
- Enter the required fields and click on the "Step 2: get users from the LDAP Server >>" button. Below you'll find an explanation of these fields, but basically they fall into two groups: the credentials to connect to the server (like when testing) and the parameters to search for the users inside the LDAP server.
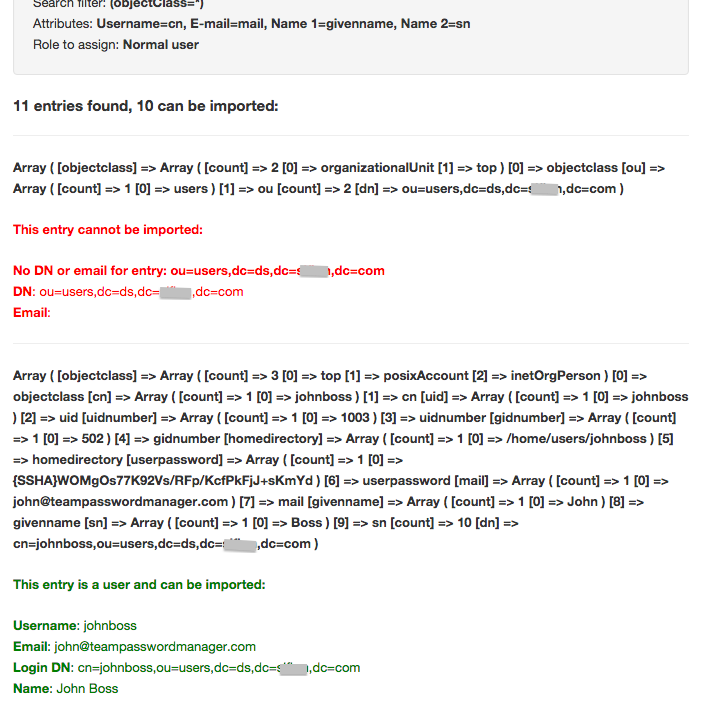
- If everything is correct and Team Password Manager can connect to your LDAP Server and fetch some users, you'll be presented with the following screen:
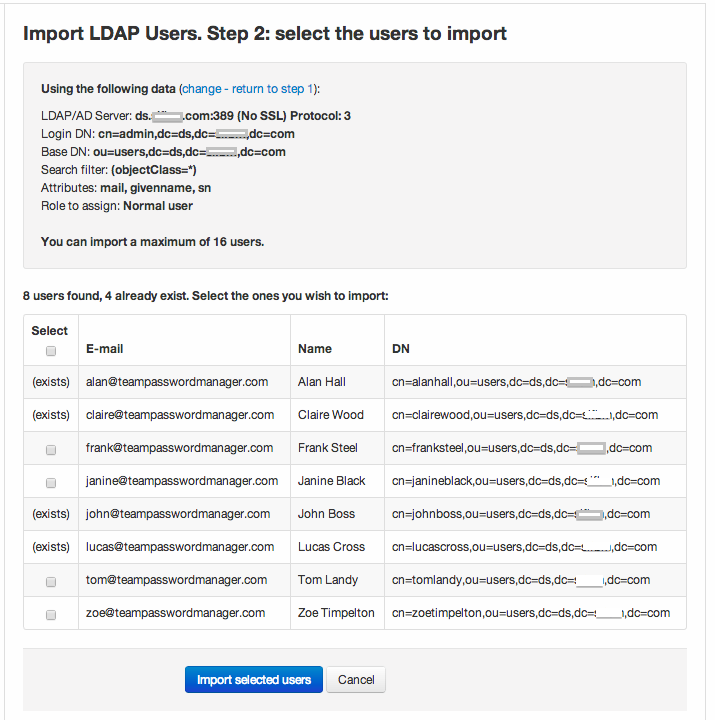
This screen shows the users that Team Password Manager has fetched from the LDAP server, listed for you to select and import. If any of these already exist in Team Password Manager (e-mail matching) you won't be able to select them. So, select the ones you want to import, or all if you want and click on "Import selected users".
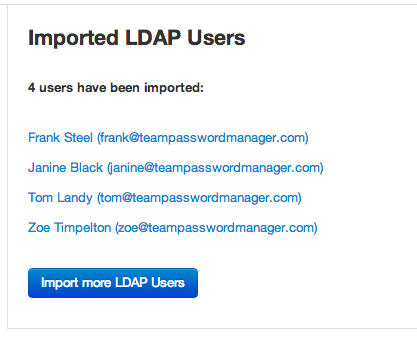
- After a little while, if everything is correct, you'll be presented with a screen showing the users that have been imported with a link to their screen:
You can repeat these steps as many times as you need to. You can enter a different base DN each time so that you can fetch user from different branches of your LDAP tree.
Here's a little explanation of the data required to import LDAP users:
- Login DN/Username, password and Anonymous: the same as in the testing screen. You can use any user that has the rights to search inside your LDAP server, in the Base DN you also enter.
- Base DN: the distinguished name from which you'll search the users you want to import. For example:
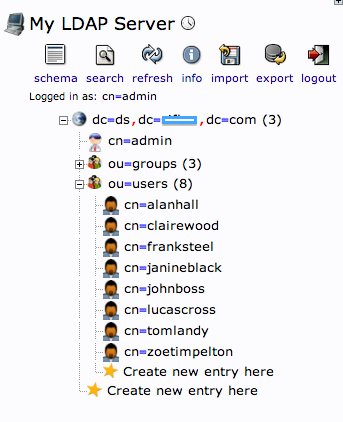
In the LDAP server from the screenshot, if I wanted to import the users from the ou=users branch, the Base DN would be: "ou=users,dc=ds,dc=mydomain,dc=com".
- Search filter: the filter you want to apply to search for users. The default is "(objectClass=*)", which will get you all the entries in the Base DN, but you might want to only get users for a specific group they belong to (example: "gid=502") or even only a specific user (example: "cn=johnboss").
- E-mail and name attributes: these are the attributes that your users have in your LDAP server for their email and name. The defaults given are the most common ones but you can change them. Note that: 1) if a user in your LDAP server doesn't have the e-mail attribute, she won't be imported, 2) if a user doesn't have any of the attributes for the name, the name of the imported user will be the local part of the email (ex: johnboss in johnboss@mycompany.com). You can later edit the user to change this name if you wish.
- Size limit: this is the maximum number of entries that will be fetched from the LDAP server. This limit also exists in your server and it rules over the one you're entering here.
- Role: the default role you want your imported users to have.
Save configuration
Since version 6.63.136, you have the option of saving the import data configuration from step 1 to the database (previous versions didn't save them). These data are saved encrypted. To do so, just check the option at the end of the form:
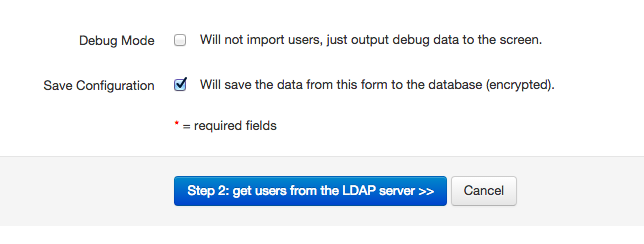
Debug mode
Also since version 6.63.136, there's a debug mode in which no users are imported and debug data are shown. To activate it, check the option at the end of the form (see previous screenshot). This debug mode is useful to test the parameters to see if users will be imported or, if not, which data are being fetched from the LDAP server. Here's a sample of these debug data:
Converting existing normal users to LDAP users and viceversa
If your Team Password Manager installation already has users that you want that they authenticate with your LDAP server, you should "convert" them to LDAP users instead of deleting them and importing them. You need to do this to preserve the user's permissions and history.
To convert a normal user to LDAP you do the following:
- Go to the user screen for the user you want to convert.
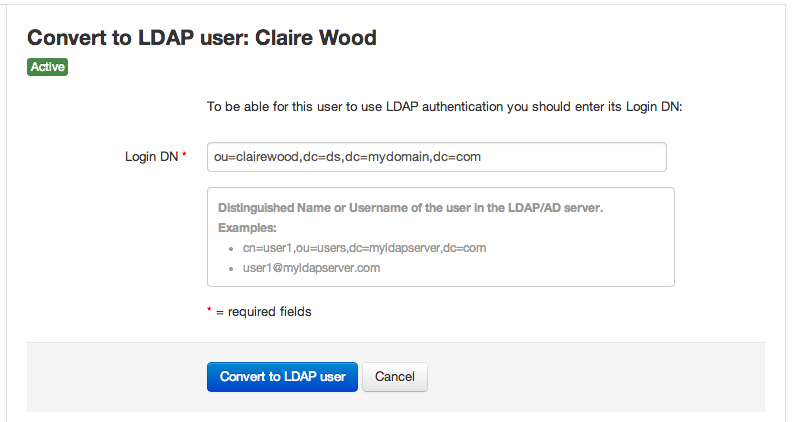
- Click on the "Convert to LDAP user" button below her name. The following screen will be shown, where you can enter the user's DN from your LDAP server:
Once you do this, the user will have to be validated against your LDAP server. Some notes: 1) the password the user had is not preserved, which means that if you convert her back to "normal", she won't be able to use it. 2) the user will not be kicked out of Team Password Manager.
Important: we suggest that at least one admin user is a "normal" (not LDAP) user. If for some reason you have problems with your LDAP server or its connection, at least your "normal" admin user will be able to sign in into Team Password Manager.
On the other hand, you can convert LDAP users to "normal" users by doing the following:
- Go to the user screen for the user you want to convert.
- Click on the "Convert to normal (not LDAP) user" button below her name and accept the confirmation question.
From now on, the user will have to authenticate using Team Password Manager's credentials. Note that if the user was previously a "normal" user, she will *not* be able to user the same password as before, and you should set/change her password or she should use the "Forgot your password" feature when signing in again.
Logging LDAP authentication actions
Every interaction Team Password Manager has with your LDAP server is logged. These are the actions that may be logged when using LDAP authentication:
- Enable LDAP authentication
- Disable LDAP authentication
- Edit LDAP authentication configuration
- Test LDAP server connectivity
- Add user (LDAP/AD)
- LDAP authentication successful
- LDAP authentication failed
- Convert the user to a normal (not LDAP) user
- Convert the user to an LDAP user
- LDAP search to import users
- Add user (LDAP import)