Custom branding
Current Team Password Manager version: 14.190.309In this document we explain how you can customize several parts of the user interface of Team Password Manager. For instance, you'll be able to change the logo (in the login screen), use your company design, differentiate a production installation from a test one, and more.
- Customizing the Sign In screen
- Sign In screen customization examples
- Customizing the SAML Sign In screen
- Customizing the passkey authentication button
- Customizing the internal pages
- Custom titles and descriptions for the 403 and 404 errors screens
- Custom menu items
- Custom Accessed Passwords report
Customizing the Sign In screen
To be able to customize the Sign In screen you can configure a custom CSS. This CSS will also be applied to the following screens: SAML Sign In, Two-factor authentication, Forgot your Password and 403 and 404 errors. To do it, use the following directive in config.php to tell Team Password Manager where your CSS file is located:
define('CUSTOM_SIGNIN_CSS' , 'path_to_your_css_file.css');
The file specification is relative to index.php. You can place the file anywhere you want but you should be able to load it with the browser when accessing Team Password Manager. We recommend you create a folder at the same level of index.php and place it there. For example:
define('CUSTOM_SIGNIN_CSS' , 'branding/my_css_file.css');
Each release of Team Password Manager includes a file called custom_signin.css in the css folder that is a copy of the CSS we use in the Sign In screen. You can use this file if you want as a boilerplate for your own CSS. We use this file in the next section to show some examples of customization.
Sign In screen customization examples
In this section we're going to see how you can customize the sign in screen in different ways: a change of the color of the border of the sign in form, a new logo and another text.
To do it we'll first prepare the CSS and accompanying files. Do this:
- Create a folder in the same level of
index.phpcalledbranding. - Copy the following files from the
cssfolder to thebrandingfolder:custom_signin.css,logo.jpg,bootstrap-responsive.min.cssandbootstrap.min.css. - Edit the
config.phpfile and enter this directive:define('CUSTOM_SIGNIN_CSS' , 'branding/custom_signin.css');
Now Team Password Manager looks the same way as always but with the difference that it's using the CSS in the branding folder. Let's change something.
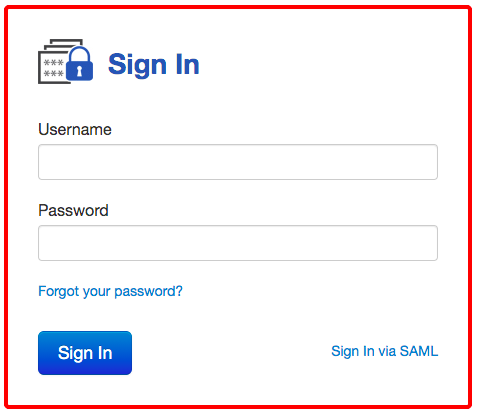
Let's first change the color of the border of the form. Open the branding/custom_signin.css file and locate the #login_form element near the top. In this element you have the following property: border: 4px solid #2A5DB0;. This sets the color of the border of the sign in form. Change it to red replacing #2A5DB0 with red, this way: border: 4px solid red;.
Open the Team Password Manager sign in page or refresh it if it's already opened. You should be able to see it this way:
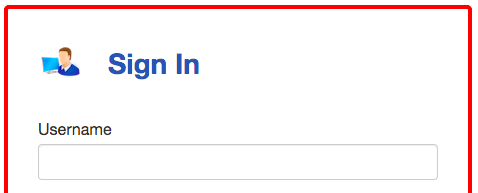
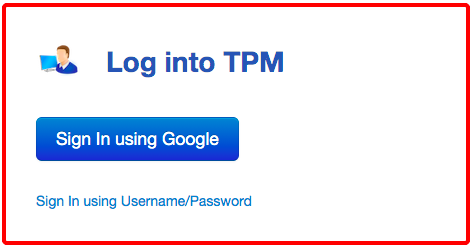
Let's now change the logo. If you look at the branding/custom_signin.css file you'll find the #login_logo element, with the following property: background: url(logo.jpg) no-repeat;. This is what shows the logo. To use another one, simply replace the logo.jpg file with yours or change the URL to point to another image file. The default logo size is 70x45 pixels, and we cut it at this size in the #login_logo element . Consider this if you want to use your logo or modify the #login_logo element accordingly. Here's the sign in screen with another logo:
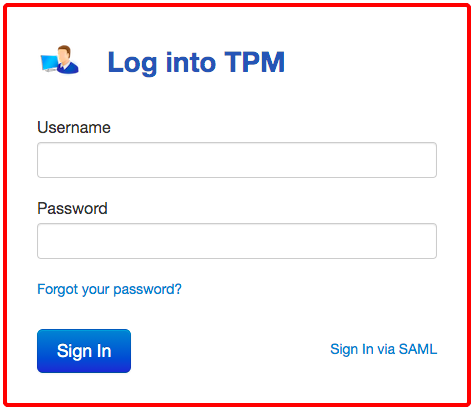
Finally, let's change the "Sign In" text to "Log into TPM". To do it, enter these CSS elements in the branding/custom_signin.css file. Put them after the h1 element, but do not replace this element, simply add them:
h1 {
  text-indent:-9999px;
}

h1:before {
  text-indent:0;
  content:'Log into TPM';
  float:left;
}
So this is our final custom sign in screen:
Customizing the SAML Sign In screen
When SAML Authentication is enabled and configured, and there are active SAML users, the Sign In screen will show a link in the bottom right corner called "Sign In via SAML".
You can change the name of the link to one of your choice. To do so, click in "Edit other SAML Settings" in Settings | SAML Authentication and enter the name you want in the "SAML Sign in Text" field.
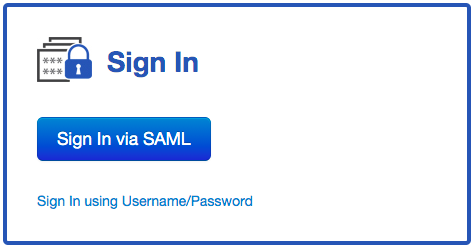
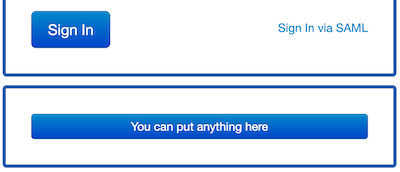
If the majority of your users are SAML users you may want to display a different Sign In screen. We've developed one that only has a button and that doesn't have the classic username/password fields:
To use this screen by default, click in "Edit other SAML Settings" in Settings | SAML Authentication and select "SAML Sign In Screen" in the "Default Sign In Screen" option.
Note that the style of this screen also changes if you use a custom CSS file. This is how it looks when using the CSS in the examples section and a different "SAML Sign In Text":
For more information read the SAML Authentication document.
Customizing the passkey authentication button
The passkey authentication button text can be set to any text you want by changing the "Passkey Sign in Text" setting in Settings | Passkey Authentication. The value of this setting defaults to "Sign In using a Passkey", but you can set it to anything you want:
For more information read the Passkey Authentication document.
Customizing the internal pages
It's also possible to use a custom CSS file for the internal pages of Team Password Manager. To do it you need to place this CSS instruction at the beginning of the software's main CSS file css/tpm_style.css:
@import url("path_to_your_css_file.css");
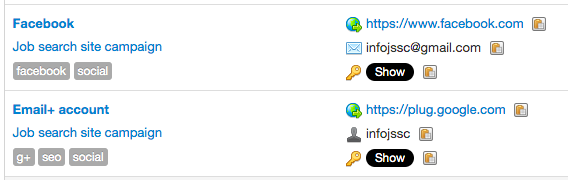
As an example, we're going to use a custom CSS file to change the background color of the "Show" buttons to show a password from blue to black: Show => Show
To do it we're going to use the same folder in the root of the software files (branding) as we used in the examples section. Do this:
- Create a file called
inside.cssin thebrandingfolder with the following content:.badge-info { background-color: black !important; } - Modify the
css/tpm_style.cssfile to include the@importCSS directive at the top to load theinside.cssfile, like this:
Now log into Team Password Manager and refresh the page (you may need to do a hard refresh). You should see all the "Show" buttons in black, like this:
Note that this way of including your CSS file is different from the one used in the login pages. This time we're not replacing the entire CSS file, but only changing the parts that we want to be different. Also, remember that each time you upgrade Team Password Manager you'll need to modify the css/tpm_style.css file to include the @import CSS directive at the top to load your CSS file.
Custom titles and descriptions for the 403 and 404 errors screens
Beginning with version 9.125.225 you can use some parameters in config.php to change the title and message of the 403 (Forbidden) and/or 404 (Not Found) error screens. The default value is shown here, just change it to the text you want:
• For 403 (Forbidden):
Title: define('CUSTOM_403_TITLE', '403 Forbidden');
Message: define('CUSTOM_403_MESSAGE', 'You do not have permission to access this resource on this server.');
• For 404 (Not Found):
Title: define('CUSTOM_404_TITLE', '404 Not Found');
Message: define('CUSTOM_404_MESSAGE', 'The requested URL was not found on this server.');
Note that these screens are affected by the CUSTOM_SIGNIN_CSS parameter if you use it, so changes in style will be reflected to them too.
Custom menu items
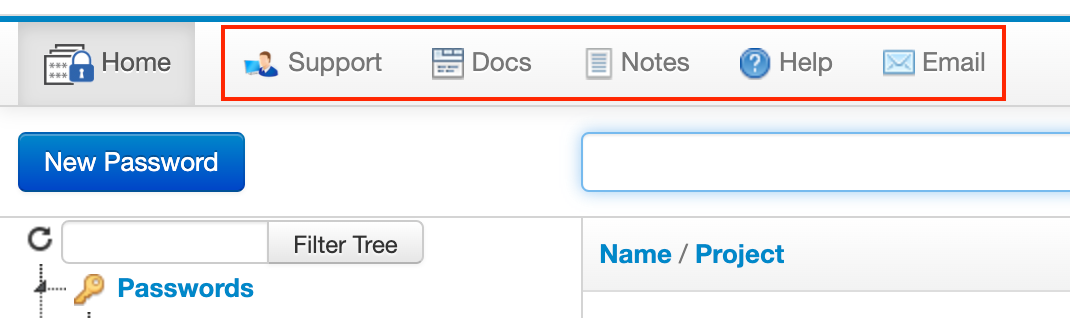
Beginning with version 12.146.268 you can configure up to 5 menu items in the top menu. These menu items:
- Have a title, link and icon (optional).
- Are located after "Home" for normal/read only users, or after "Settings" for Admin/IT users.
This is an example of 5 custom menu items in action:
You create these menu items using the following parameters in config.php:
CUSTOM_MENU_X_TEXT: the text that will be shown in the menu. The shorter the better.CUSTOM_MENU_X_LINK: the link that will open when the menu item is clicked. It must be anhttpsorhttpURL.CUSTOM_MENU_X_ICON: the icon that will be shown before the text in the menu. It's optional. Its size should be between 16 x 16 pixels and 20 x 20 pixels. The following style is applied to it so that the menu doesn't become higher than the normal size:max-height:20px. The icon should be an image file and it's referenced from theindex.phpfile.
Where X is a number between 1 and 5.
As an example, the first item on the above image would be defined like this:
define('CUSTOM_MENU_1_TEXT', 'Support');
define('CUSTOM_MENU_1_LINK', 'https://teampasswordmanager.com/support/');
define('CUSTOM_MENU_1_ICON', 'branding/support_rep.png'); // branding is a folder at the same level as index.php
Custom Accessed Passwords report
In v. 14.177.303 we introduced the Accessed Passwords report, which is fully customizable.
Go to the How to customize the Accessed Passwords HTML report section in the Accessed Passwords document to learn how to do it.
Document changelog
| Jul 7, 2026: | Customizing the passkey authentication button |
| Oct 15, 2025: | Custom Accessed Passwords report |
| Jul 12, 2023: | Custom menu items |
| May 23, 2021: | Document created |